This ink sample sheet is now ~5 years old. I made it to test if putting glossy or matte top coats over homemade inks would help preserve their colour (spoiler: nope).
🌳✒️: I made this sampler before I made some of my favourite inks — sumac, oak gall, soot… But it’s proven useful as a tool to see how some inks will age. Some natural inks start out incredibly vibrant, and shift over time to different tones. Buckthorn berries with lye are one — settling from a vibrant green to a mustard yellow. Environment and circumstance play a role too. The wild grape here has settled to more of a rust, while in other paintings I’ve made it’s stayed a bright purple. And that’s fair — I weather a lot faster when left in direct sunlight too.
🎨⌚: It’s a curious reflection and exercise in resilience. The inks will still be there, years later, still present on the page, just not the way they were. Knowing that, though I really enjoy the moments when the colours are vibrant and exciting, I try not to paint around particular hues. (Contrary to Robert Frost, gold is happy to stick around, while nothing green can stay.) So, instead, what’s the crux of a critter? What’s the deeper part that persists, when the superficial stuff goes… squirrelly?
🌱🎉🔄: Making homemade inks also doles out joy over and over. Much more than the intemperate high of a shopping spree. The joy of foraging for the plants, the joy of cooking up their colours, and of exploring their interactions as they run together on the page. Three joys for the price of none. And then the fascination of watching as the created image grows and changes alongside me. It’s not such a bad thing, this evolution and impermanence. Less like a moment lost, more an unfolding adventure.
See the inks in action over on our Wild Inklings page.
Failures: Past, present, and future? I fail all the time. Up, down, sideways. Also, I don’t believe in failure.
That is click-baity though because of course I do. I’m a present day human. I’ve been trained my whole life to believe I fail at every turn. As a female, I fail just waking up as a shape. That is, of course, garbage, but here we are.
⚽🐍: Okay, so here we are. A world of moving goalposts, and impossible ideas of “perfect”. But next comes the choice. The choice to suck the fear of failure right out of it, like a toxic snake bite, and spit it away.*
(*My analogies are getting grosser, and also I think you are definitely not supposed to do this. “Cutting and sucking the wound only serves to increase the risk of infection.” Thank you for coming to my snake bite PSA.)
🥔📺: I believe I failed only when I don’t try again. If something didn’t “turn out” immediately, and I sat down to wallow in TV and potato chips. Now everyone needs recoup time when the seed doesn’t grow, the sides aren’t square, or the code is borked. Potato chips are tasty, and sometimes there’s an inspiring tutorial on YouTube. But fall down 7 times, get up 8.
A bruised ego can heal, and come back tougher. Letting your ego get bruised can be like training for a fight — kicking a coconut tree to toughen up your shin, a la Van Damme.**
(**OKAY THIS IS EVEN WORSE THAN THE SNAKE BITE THING. Don’t kick coconut trees kids.)
🍐: Yesterday I tried making pear jam. It didn’t set cuz there wasn’t enough sugar. Fail… But now delicious goop for my oatmeal.
👩💻: I coded a layout that didn’t resize correctly on every device. Fail? No, just needed some tweaks. Now I know more.
🎁: I’m trying a new way of long-term potato and pear storage. Will it work? Shrug! Today might be the first day of a long slow fail. I hope not. But I won’t regret the fail if it comes. I’ll regret not trying.
Maybe I’ll end up with a box of sprouty spuds, and a mushy mess of pears. But maybe, maybe I’ll be biting into a luscious pear in the dead of winter, savouring the taste of trying.
Here’s to failing and trying again, to correct handling of snake bites and respect for coconut trees.
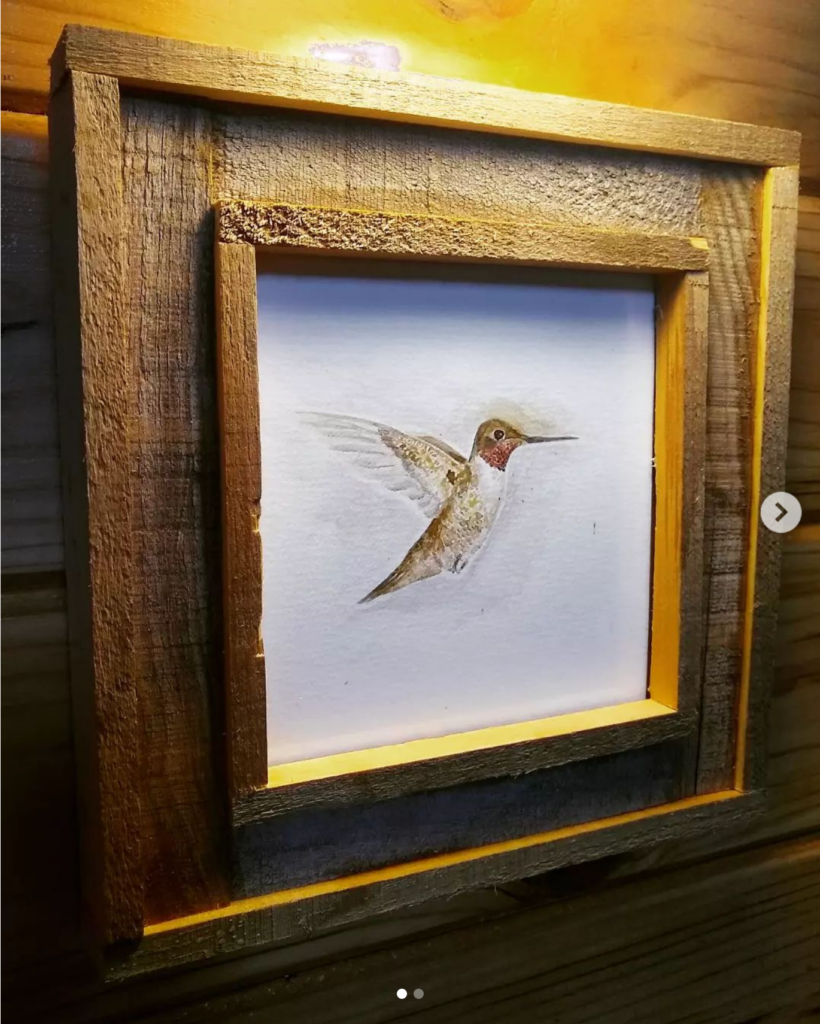
Junk art! What do a box of cat food, a bit of sumac, offcuts of wood, and a smashed photo have in common? This hummdinger of an art piece!
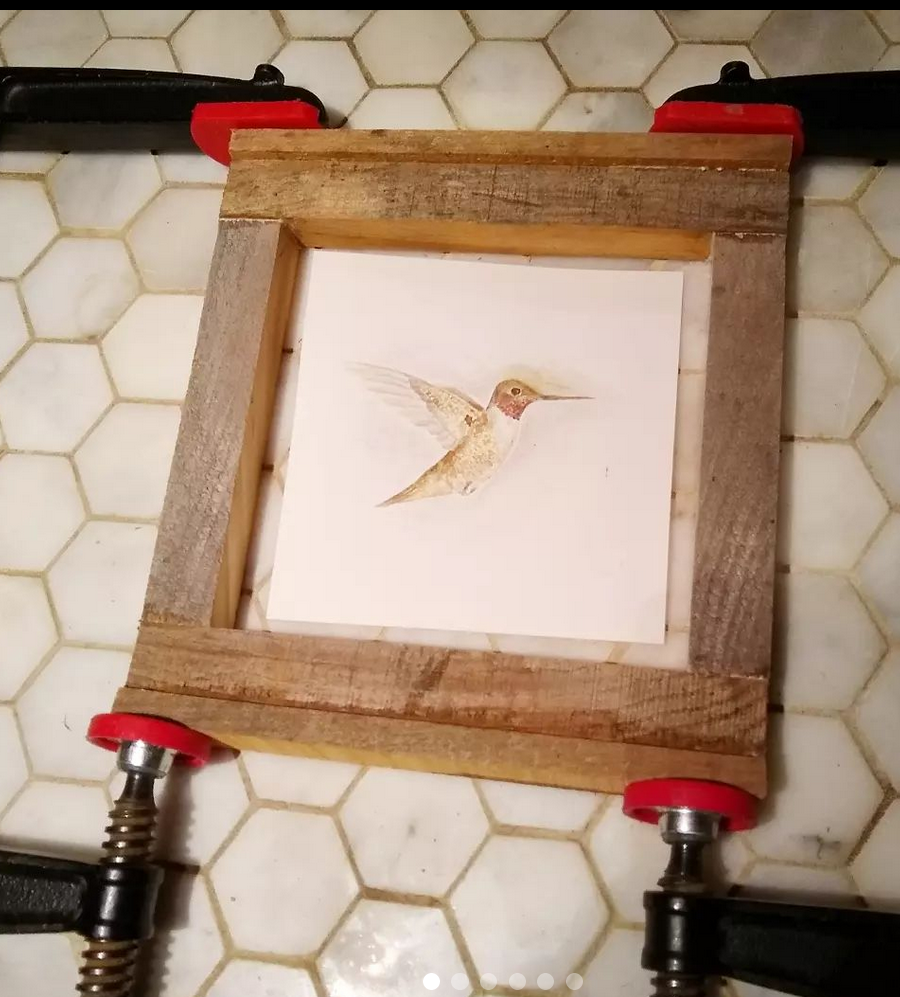
📏🐈: First upcycled + DIY picture frame… complete! I made the picture frame from scraps I recut on the table saw/by hand, a piece of broken glass I recut, and cardboard from the boxes from Oliver’s cat food + Neil’s office chair…that I recut. Recut, remix, reward! 💚 (See previous post for parts prep.)
🎨🌱: I painted the hummingbird with inks I made from plants: buckthorn, wild grape, avocado pits, goldenrod, sumac, grapevine charcoal.
♻️💪: So satisfying to bring it all together in something more than the sum of its parts. Upcycle for the win!! Have a great weekend makers!
📺: “Junk art” is a reference to Beau Miles’ “Junk” series on YouTube. Highly recommend, two thumbs way up 👍👍
I’ve had to wait years to become a patient person…
🚍⏳: And being a maker can require a lot of patience. Parts take time to arrive, solutions don’t always work as expected, repairs take a few tries, experiments don’t succeed on the first go. It can be a long ride on the strugglebus before you get to that final destination, Euphoria Station.
🧐⏰: My secret to being a very patient person is that I cheat. I can wait years if I have to, but I stuff those years full of many things, with many different timelines. So as one project is rolling off the finish line, I’m usually popping three new ones in the queue.
🔨🍇: Nature goes at her own pace, and so do third-party parts suppliers. So while I’m waiting for a part to arrive, I start a cordial infusing. I might only find one oak gall that morning, but that evening I can add a few more stitches to a repair. Strip the bark for a basket handle, install a faucet, save a seed, start learning how to fix a lamp. Not every day can include a completed project, but most days advance one — or five. It’s all in my new imaginary book: The Impatient Person’s Guide to Making Slow Things Go Fast.
(Though I’m capable of waiting a long time if necessary, it has to be for *good reason*. I once took a personality test whose conclusion included the phrase “Don’t waste Kate’s time”. I’ve never felt so seen by an inanimate algorithm…)
🎨🌳: This is an upcycled picture frame in progress. I don’t have any frames for the wild ink art I make, in part because I’m determined to make them. So I’ve held on to a big piece of broken glass for years — waiting for me to make the time to buy a glass cutter and learn how to use it. And find the right offcuts of wood and rip them with the table saw. Now I’m waiting on the little tabs to hold everything in place. It’s been a long wait, but Euphoria Station is only a few stops away now. I can see it.
🙃⌛: I’ve backed into being a patient person by way of being a determined one. So if you’re a determined but impatient person like me, there’s hope for both of us. We can’t actually cheat time, but we can change how it passes.
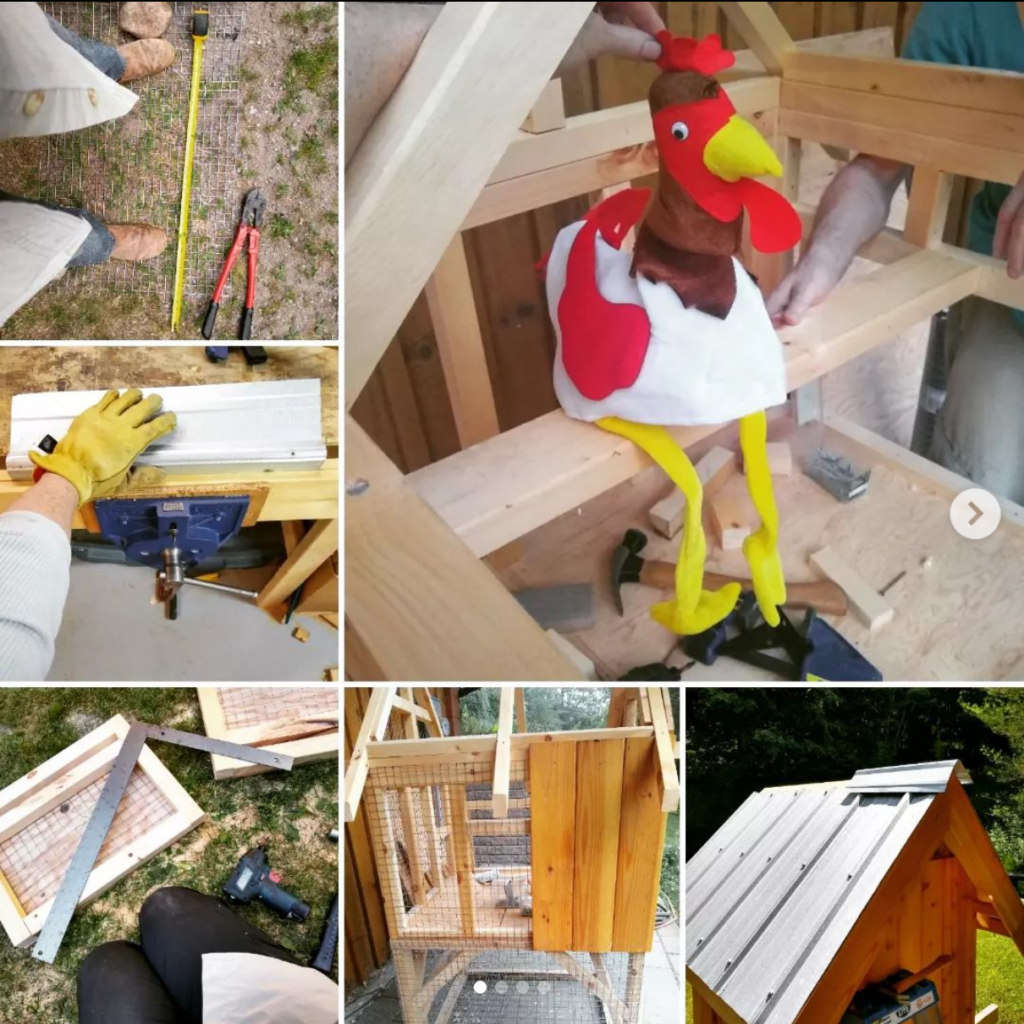
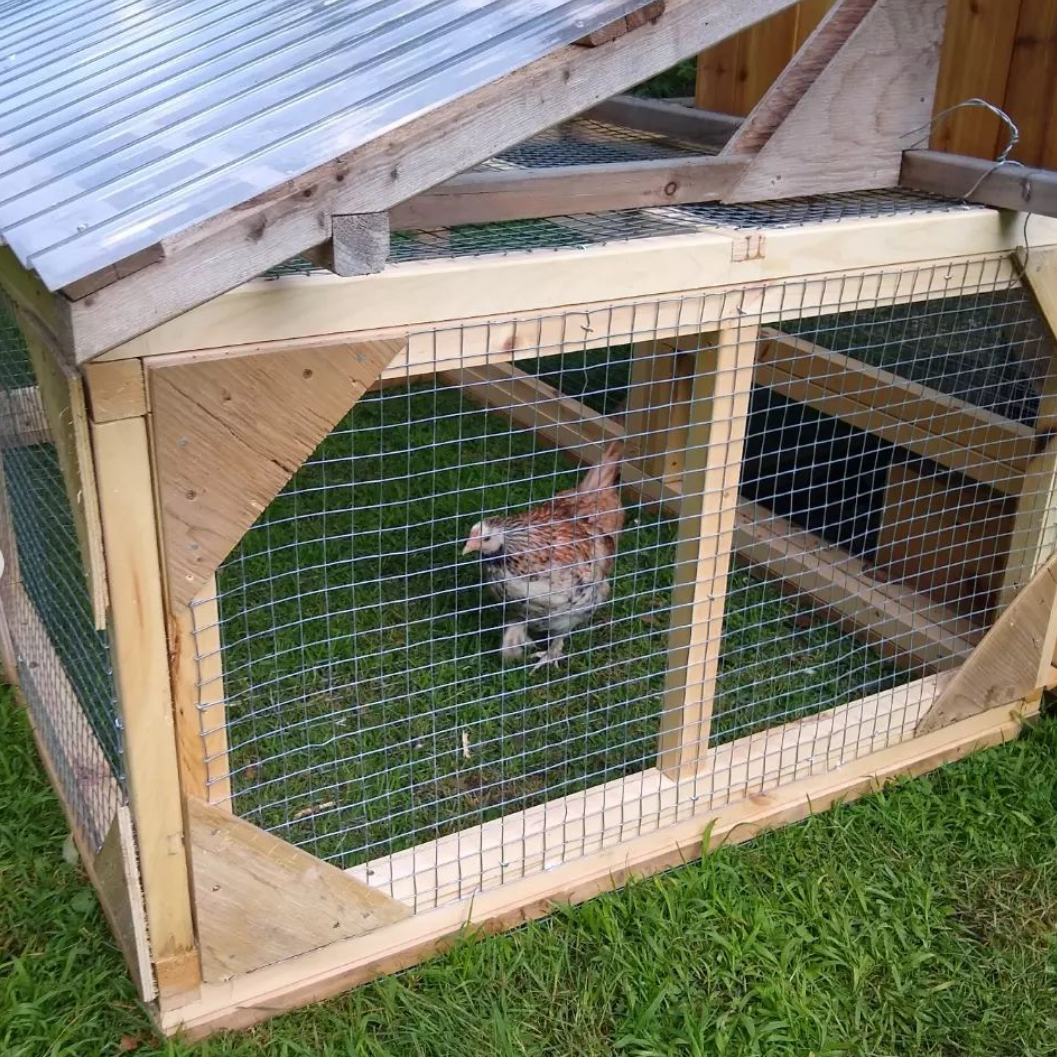
🐤🐤🐤: We built a “new” mini-coop this summer. Sometimes a few chickens need to be separate from the flock for awhile — introducing new birds, a hen with chicks, too many roosters, an injured hen etc etc. Usually you’d pop them in a barn, but we don’t even have a garage, so by “barn” we usually mean “Kate’s office”. While I like my office to be modular, I also like it not to smell like chicken.
♻️🏗️: There is some fresh lumber in this build — we rip down ungraded/seconds 2x4s for the framing. But also so many scraps!! Including extra fence boards from raised beds as cladding, a salvaged steel roof, and part of our friends’ old kitchen island.
✂️🏠: The ridgecap is probably my favourite part of this build. We had just enough metal roofing to solidly patchwork the roof, but no ridgecap. So I took my tin snips to the extra pieces, and with a little 170lb persuasion (I leaned on them), I convinced the offcuts what they really wanted to be was a ridgecap. They generously agreed.
👩🚀🐔: A separate 4×6′ extension airlocks on to the main building, so the little dinosaurs have access to a larger patch of greens. Dig dig look, dig dig look…
🌱💦: The temporary clear roof on the extension is repurposed from another build, and is ultimately destined to become part of a water collection and irrigation system for our off-grid garden. It’s like a Matryoshka doll of repurposing. Plans within plans!
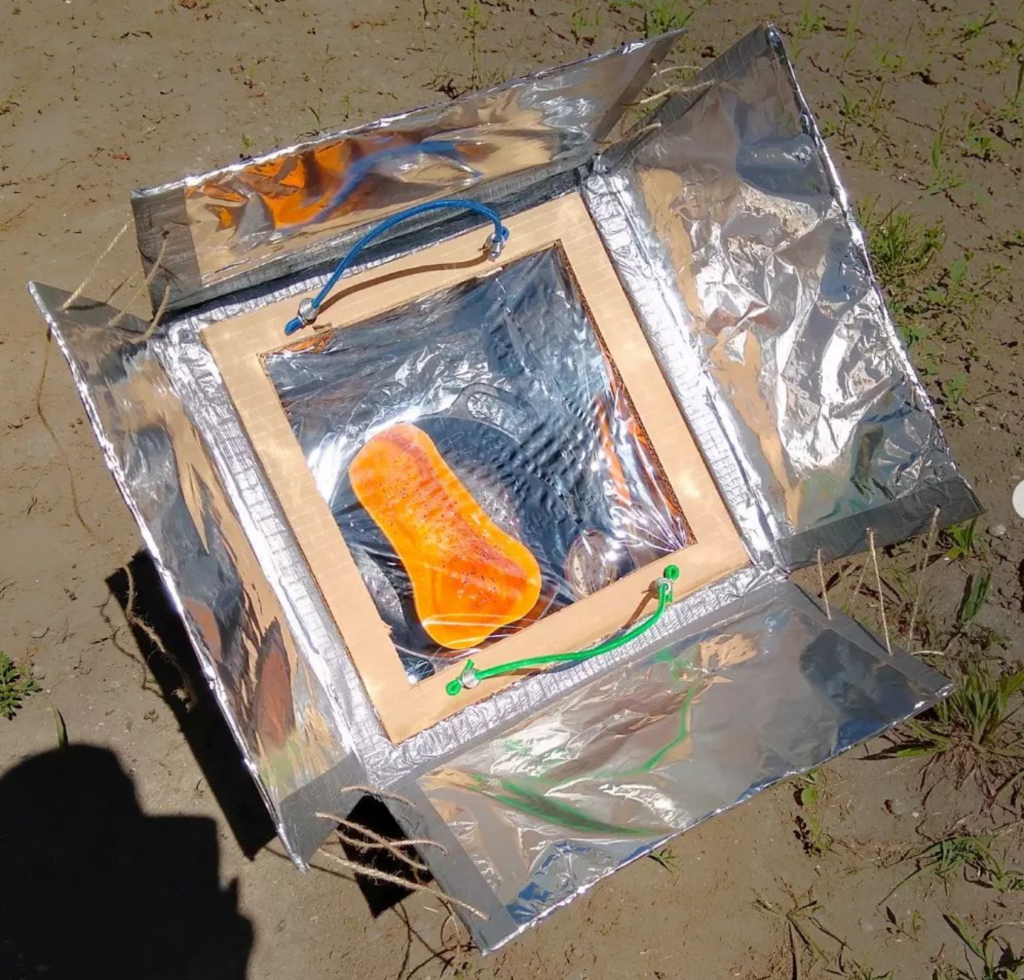
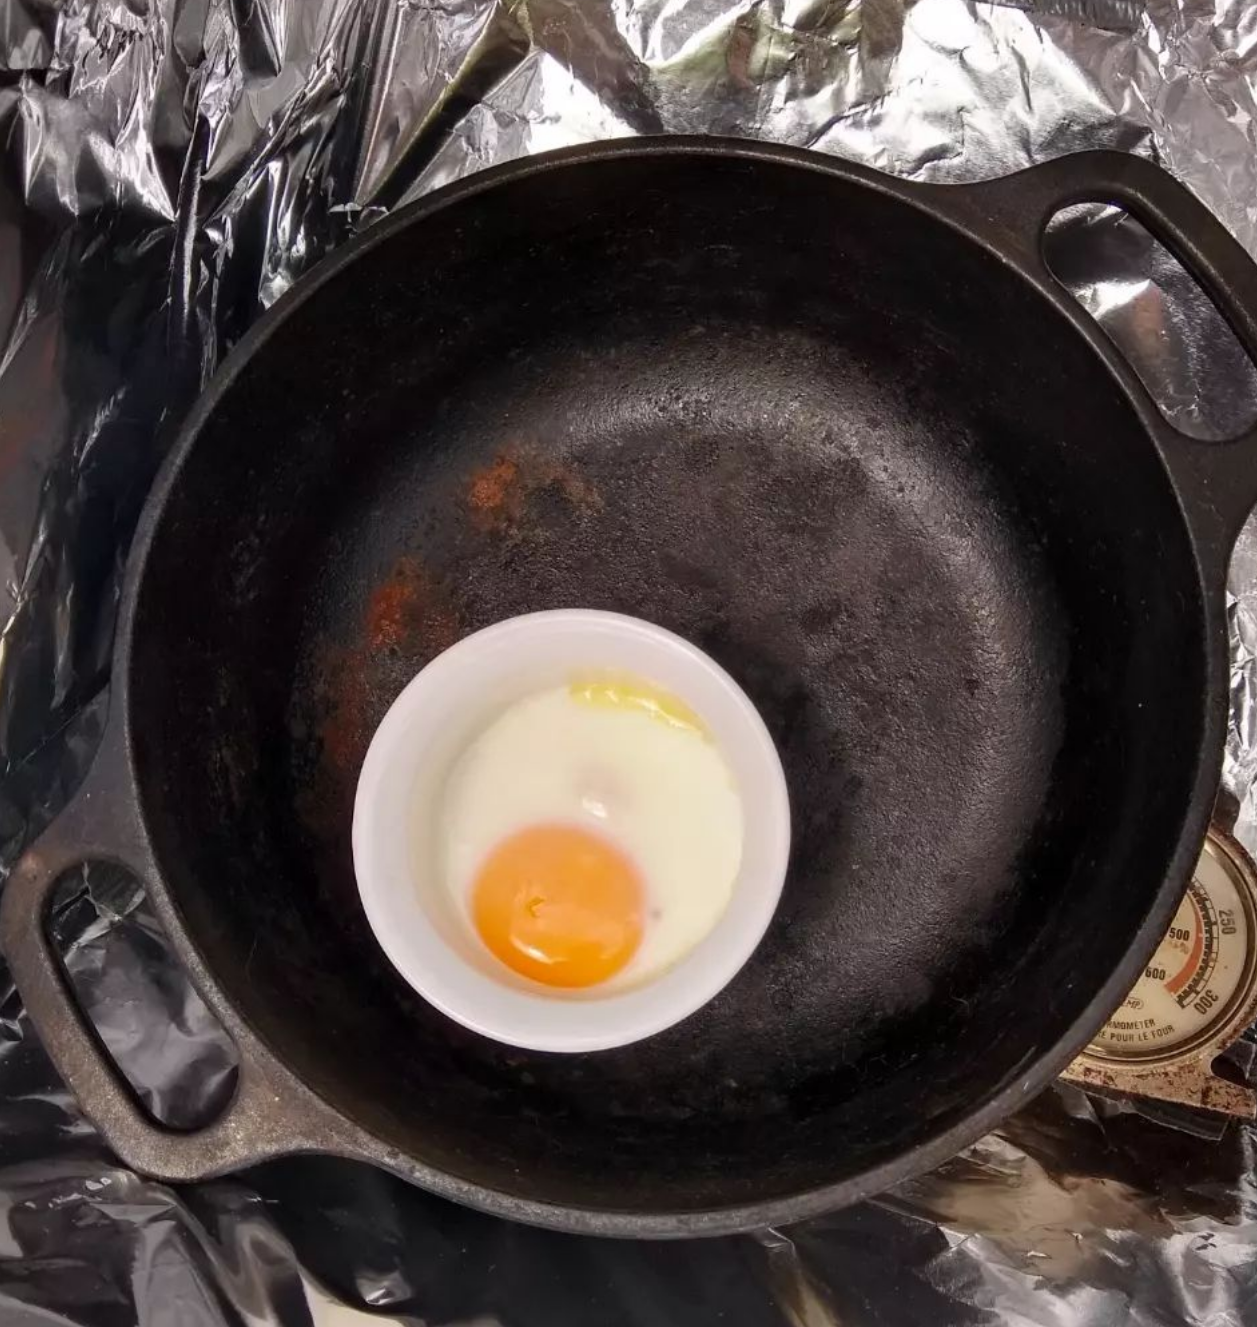
Solar oven — made from a cardboard box! Is it hot enough to cook an egg out there??
Solar oven side quest: Before work on our new chicken coop one day, I decided to try making a solar oven from our recycling. The heart wants what it wants.
✂️📦: Wired has a tutorial on making a solar oven from a cardboard box, insulating material (like styrofoam), duct tape, tin foil, and some cling film. I have those things!
👷♀️💭: I modified the Wired design a bit, making the front panel more easily removable (bungee handles), and punching holes and lacing string through the outside flaps, to help direct the sun.
☀️🌡️: After a bit of time outside, the oven temperature got up to a whopping 200F! Okay maybe not “whopping”, but… consistent! A slow-and-steady 200F! The black cast iron pot inside the oven got scorching hot. Too hot for bare hands.
🍆☁️: My first “dish” was half a squash. Which was… ambitious. I have to adjust the box to track the sun (cardboard can only do so much), and we had to go out that day. The shade drifted over and absorbed the oven while we were gone. The squash got sun-kissed, but not cooked through.
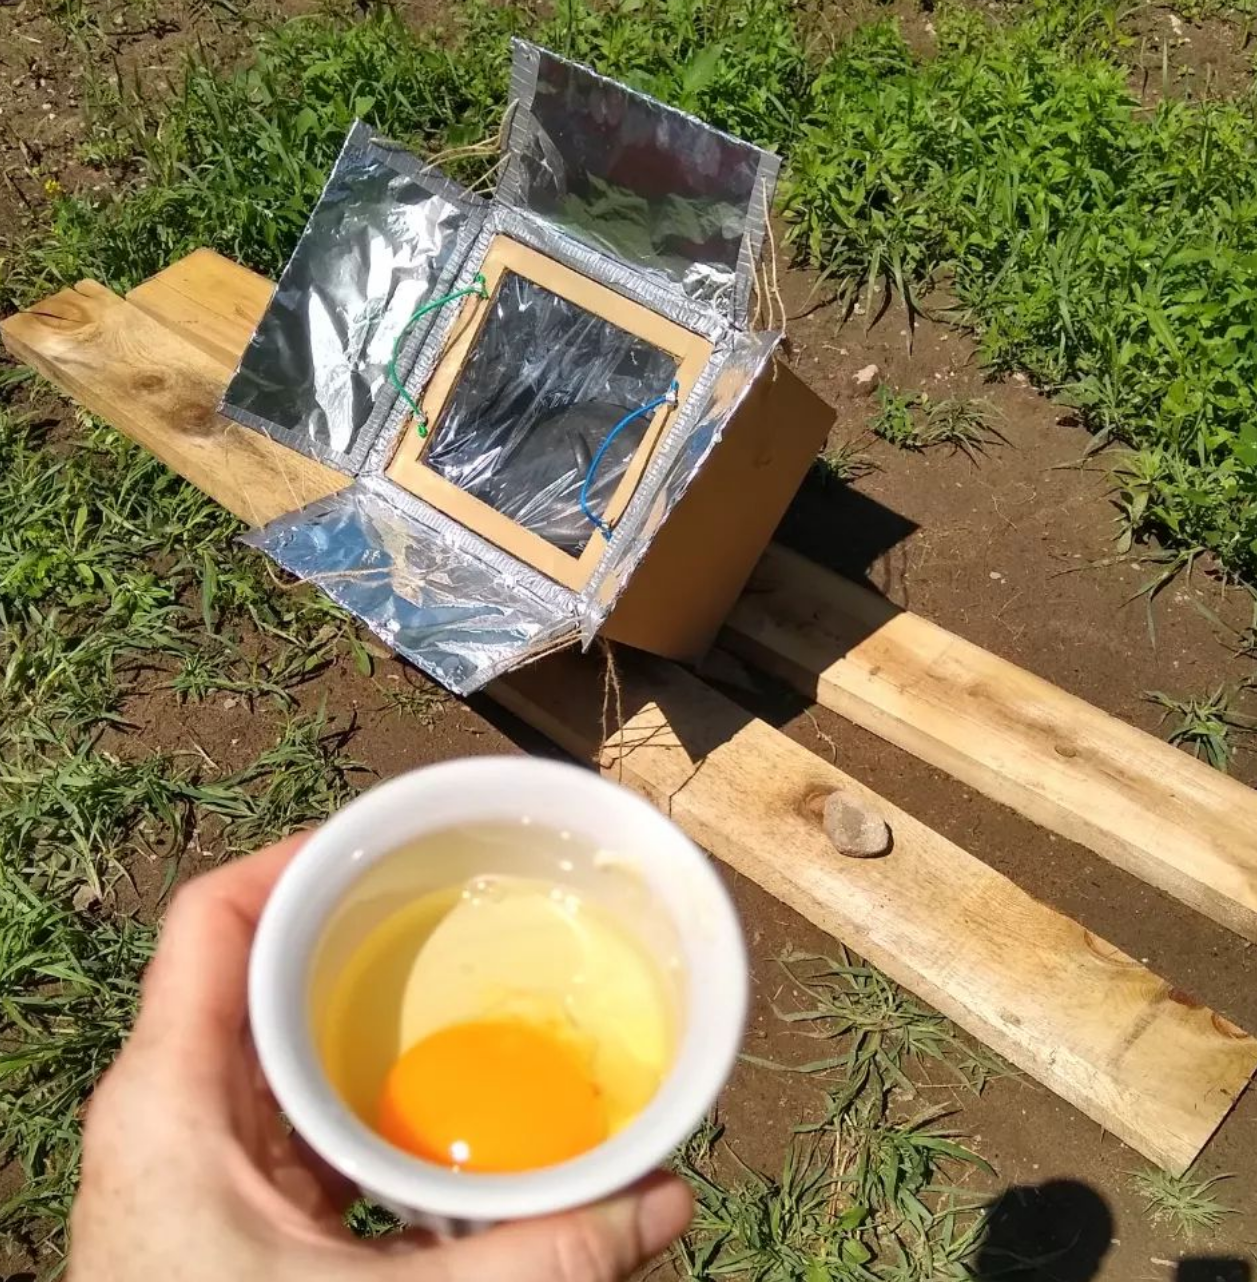
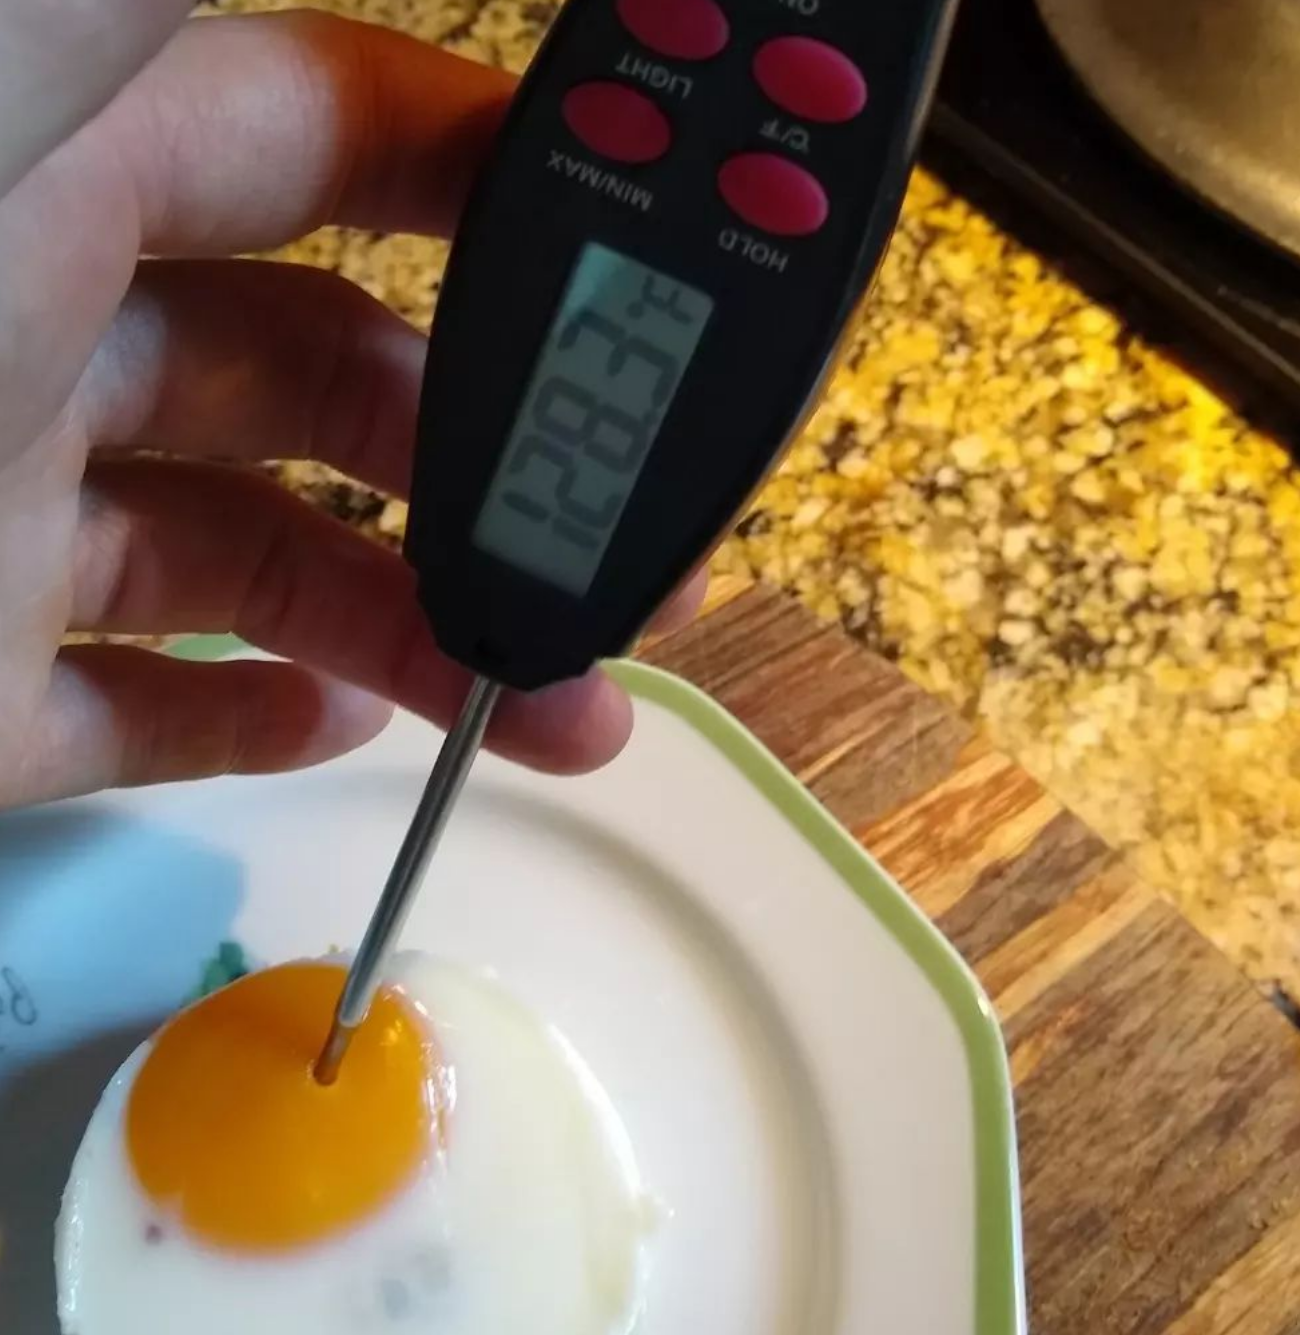
📦🍳: Yesterday I tried round two, this time with an egg. Once again, the oven stayed right around 200F.
And success! After about an hour the egg was cooked through. I didn’t think to check the internal temperature until the egg had been out of the oven for ~10 minutes. By then it registered around 128F. Safe temperature for eggs is 160F, so I’ll make this a “twice-cooked” egg (heating it up inside) before putting it in my face hole.
🍫🤢: Why mess around with a raw egg instead of just making s’mores you (and Neil) might be asking? You both make a good point, but here we are. Also I wanted to see what would happen. (To the egg, not my GI tract.)
Do you have any suggestions for (very) low-and-slow cooking? I make our granola at 225F, so maybe that is worth a go…?
🌳☀️: Here in the woods, our days of strong overhead sun are only just beginning. Let’s see how toasty I can get this ol’ pile of packaging!
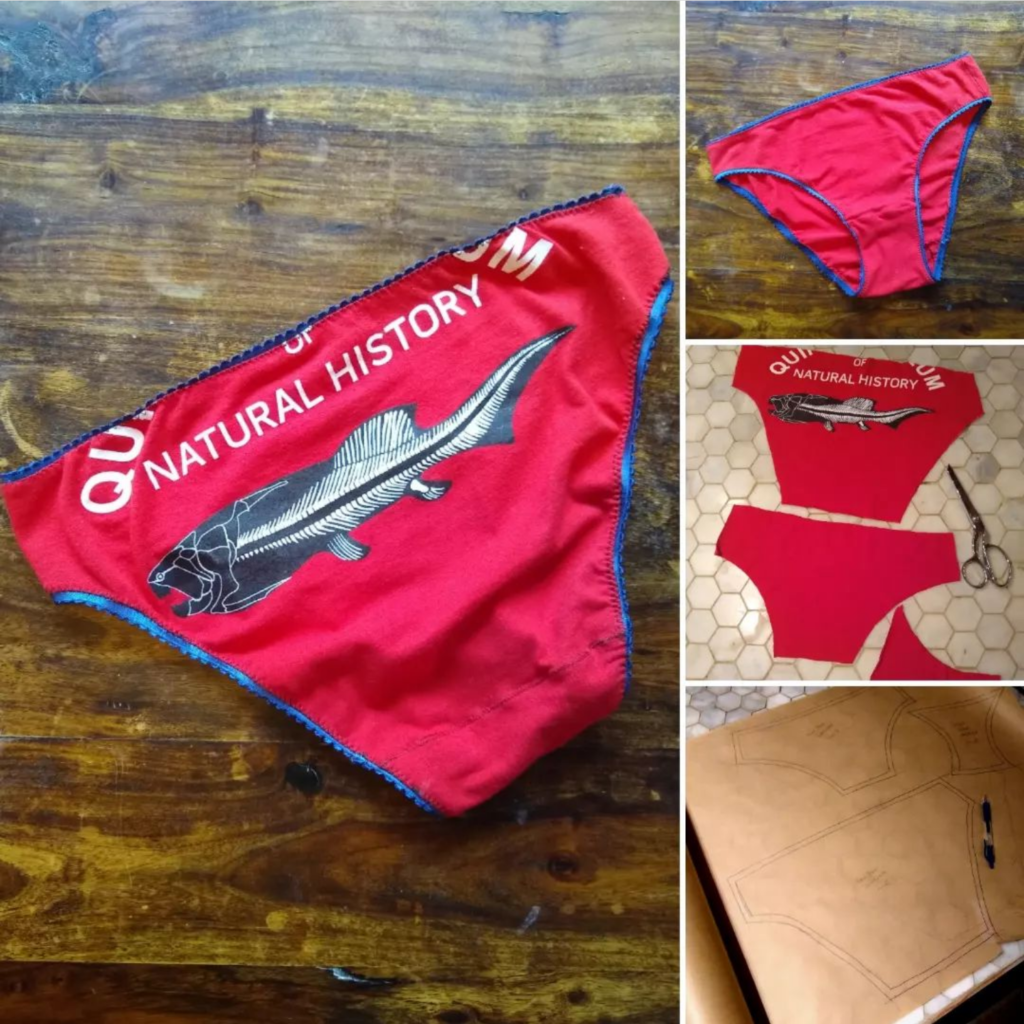
I bought this t-shirt in support of the Quinte Museum of Natural History, before it had a bricks-and-mortar home. I really like it, but it’s never quite fit me right — on my torso. Fortunately that is only one place I require clothing…
In this tutorial I found, you take an existing pair of underwear that fits you well (not shown), and use it to make a pattern. Then a little snip snip stitch stitch and, bam! “New” underpants!
+1 for upcycling your old t-shirts, +1 for increasing your stash of well-fitting underwear, and easily +2 for getting to wear a prehistoric fish on your butt.
(I don’t know the name of this beautiful fish-monster. But it reminds me of a coela.. coleaca… coelanct… That special fish you can get in Animal Crossing.)
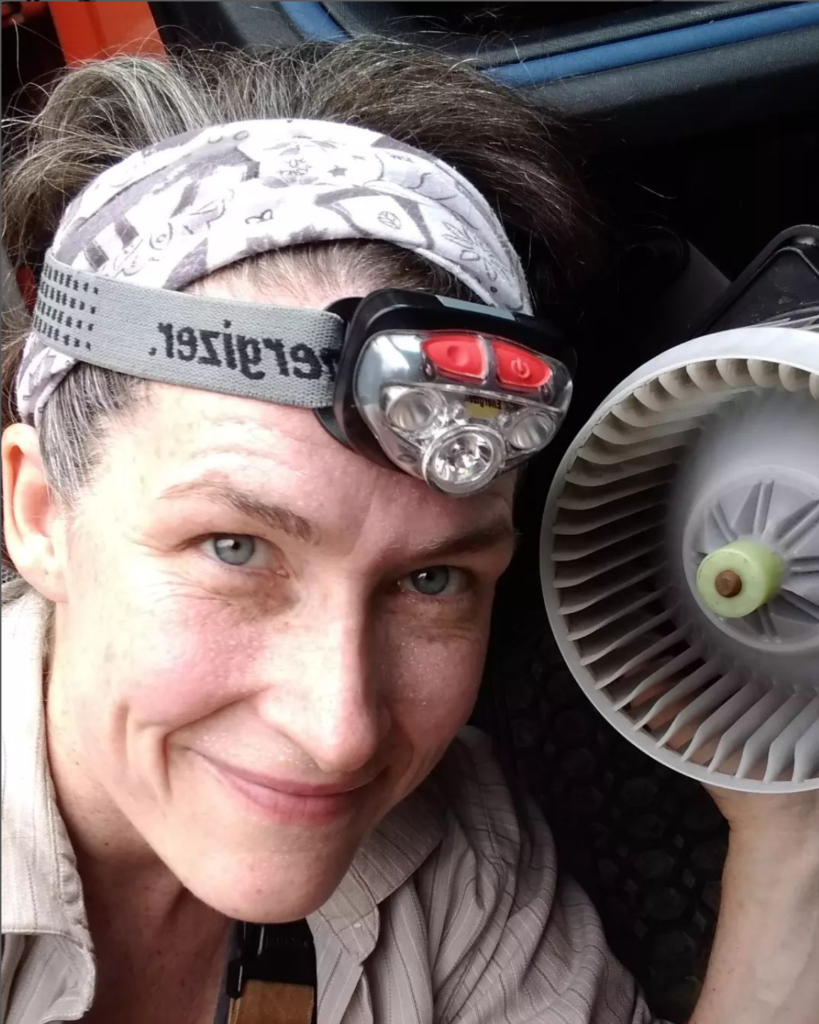
Today I changed the blower motor in our car and polished its headlights. Harvested mulberries for jam, picked rose petals to dry, did laundry, and cut wood to build a chicken coop. Some jobs where women have historically been excluded, and some jobs where men have.
“You only have to let the soft animal of your body love what it loves.”
Wild Geese by Mary Oliver
I love to fix things. Though I had pulled out the blower motor once before (to thwart a chipmunk nest in progress), I hadn’t yet replaced one. But the more you repair, the easier it gets, and the more you see the crossovers.
Things are made up of other things, and we humans tend to reuse our ideas. Refilling the spool on a weedwacker is near exactly the same as winding the bobbin on a sewing machine. And a blower motor unplugs from a car just like… well, anything else you plug in. If you have plugged or unplugged anything ever, you’re halfway there!
Grease and solder and thread and metal and wood and seed and wool. Make it from scratch, take it apart, put it back together, love what you love.
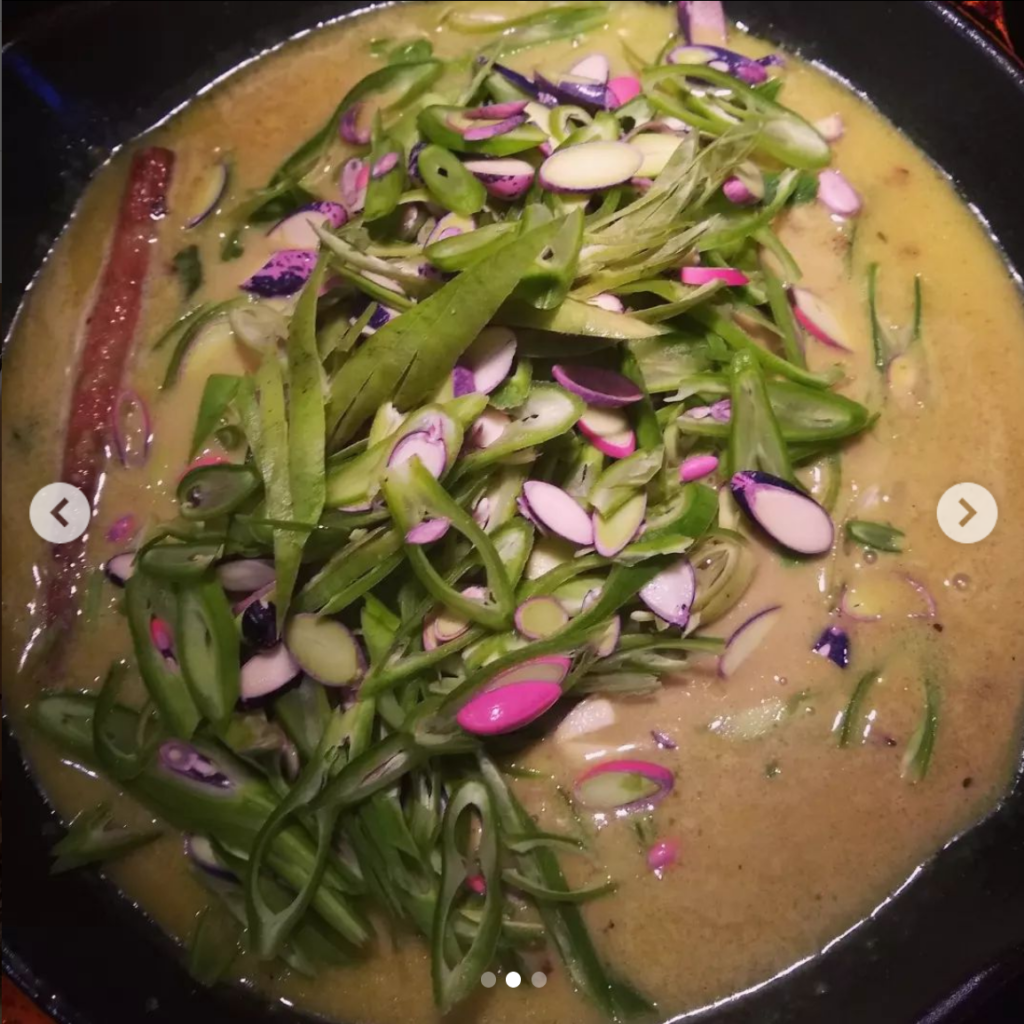
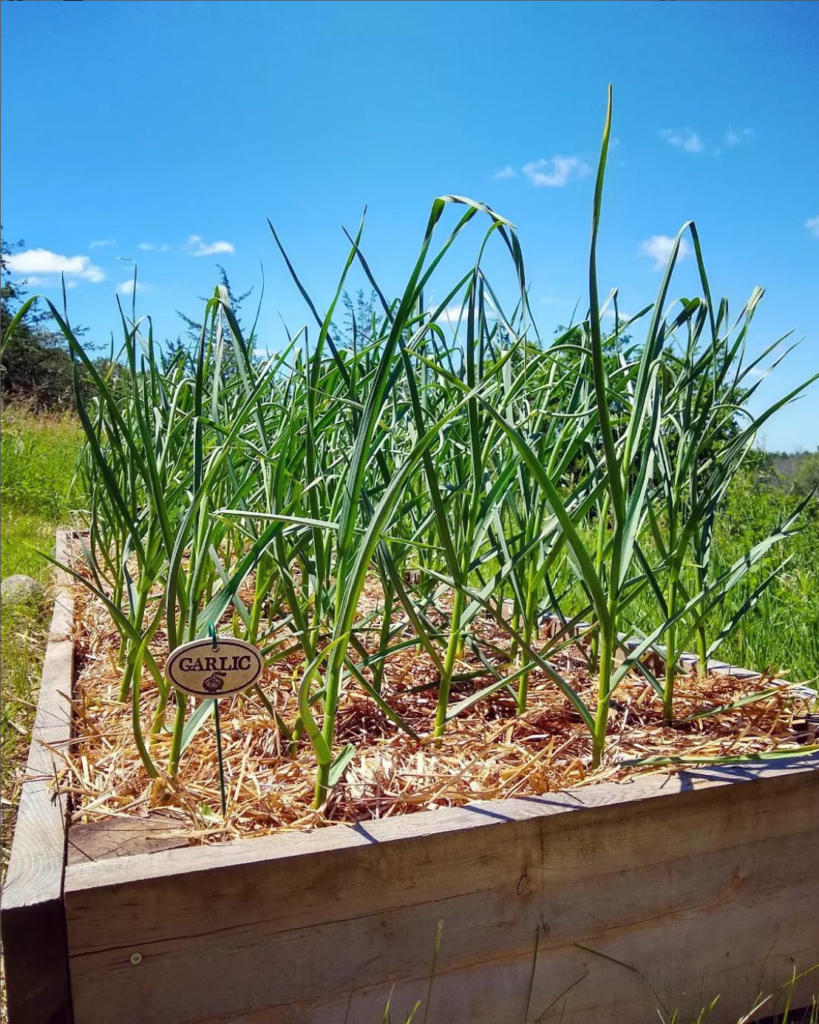
Experiment success! Sea of garlic scapes 💚 Three years to first harvest.
🗓️🗓️🗓️: Year one, we graded and prepped the site (microplastics mistake: we tarped, but should have used cardboard). Year two, we removed the tarp (and every little strand of broken down tarp we could find). Then we built a 3′ x 14′ raised bed from offcut hemlock boards. Then Evie (🚙🔋) and I filled and filled and filled the bed. Finally, planting and mulching. And now, year 3 — garlic!
☀️🧛♂️: This area gets a lot of sun, the most of anywhere on our property — and is also full of ticks. As in “I’m going out to Tick-ville to check the fence line… and collect a bunch of ticks on my person.” The bucolic beauty of this place comes with stark realities — flaky power, low water — and ticks are an often unseen part of the picture. (Neil has had Lyme disease, and it’s no joke.) Tick checks and tick management inform our rhythms here. So it was A Decision to see if we could make a garden bed work here, where the wild ticks roam.
🤔💭: This area has only a scrappy thin layer of soil, plenty of bunnies, and no water nearby. So we wanted to plant something that could: largely be left unattended; be unappealing to wild critters; thrive in full sun; get by on rain or irregular watering; and, be harvested in short spurts, not continuously over the season. Garlic!
👷♀️💧: We plan to build a rain collector out here, and more beds that fit these criteria (Planting suggestions welcome!). But for now we will make giant bangle bracelets with our bountiful scape harvest, and enjoy the fruits, shoots, of our labours.
Many many many years ago, I saw a Lee Valley product that was a mould for making “ice lanterns”. The photograph was enchanting. A winter walkway lined with glowing ice. I thought it was completely delightful… for about a minute, and then the logistics of putting together such a scene rolled over me. You’d need a mould for each lantern, or to mould one lantern at a time, you’d need to freeze each mould, etc etc.
But the idea went into deep storage in my mind. Fire and ice, together at last.
(My love of fire and ice runs deep. Before Neil shared his dream with me of a wedding shared with family and friends, I originally wanted to elope in a red dress at an ice hotel in Sweden. Perhaps for our 50th anniversary…)
Sometimes when I get a few steps further down the maker path, I’ll suddenly realize that I now know how to make an old idea come true. With all this good cold weather recently, I was inspired to look up D-I-Y Ice Lanterns, and the internet did not disappoint.
I used a hybrid solution, based on a few different suggestions. And with a bit of trial-and-error, and one false start, it turned out beautifully!
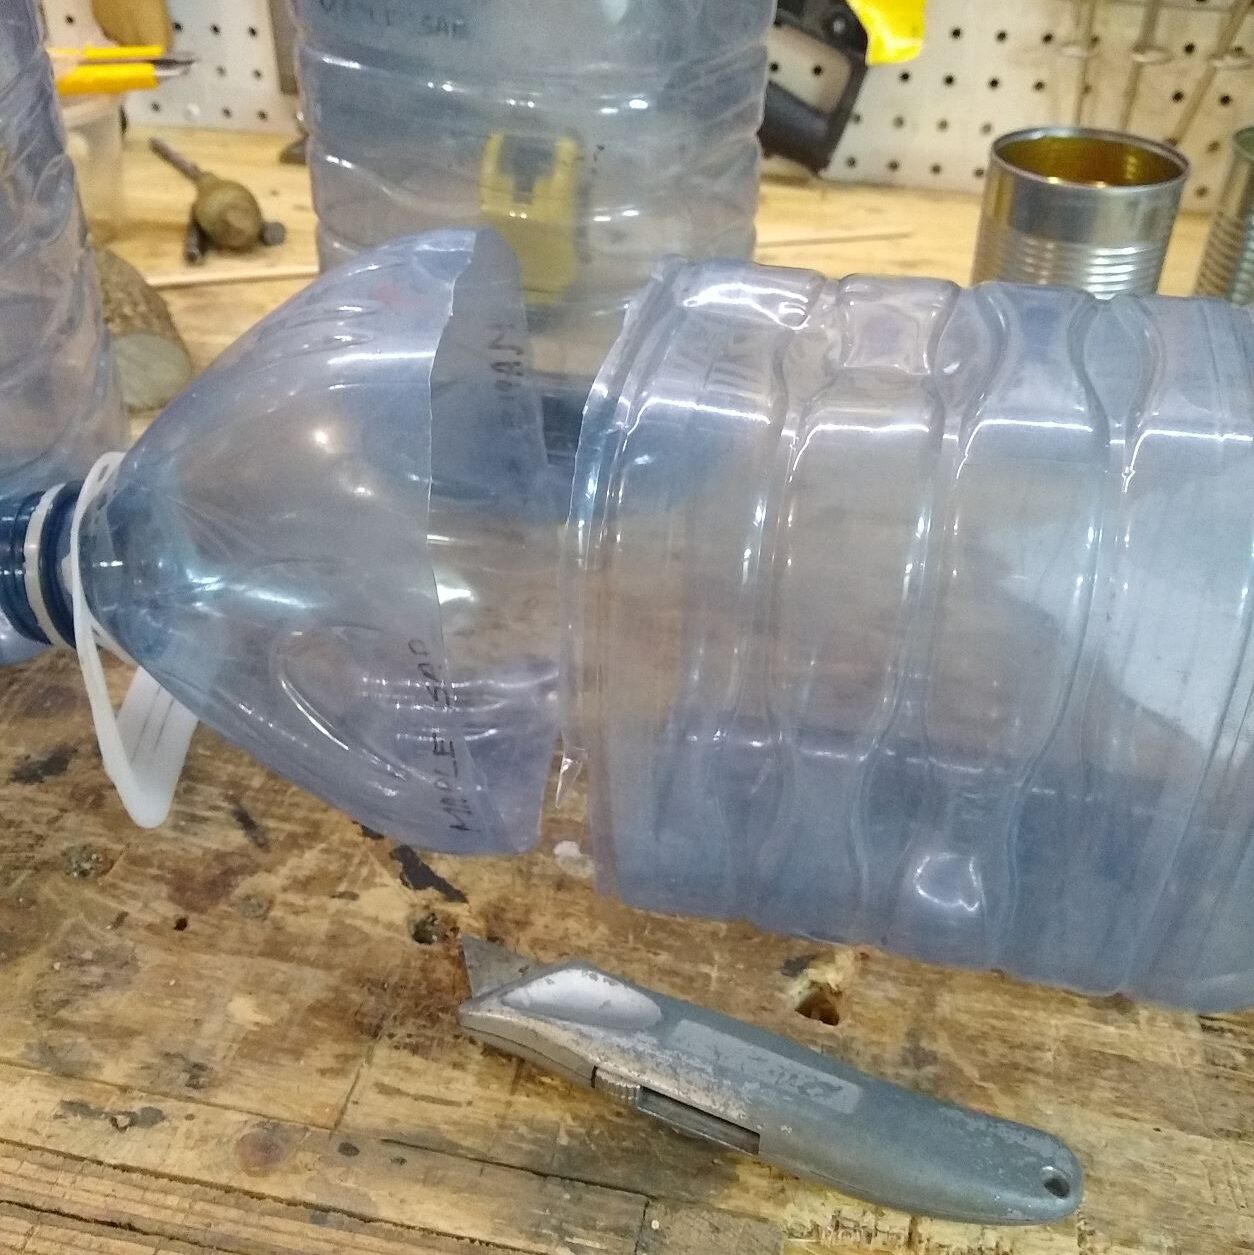
Step 1 was to make a mould. For this, I used one of the many plastic water jugs we keep for transporting maple sap. We buy in distilled water to top up the batteries on our electric side-by-side. Once the jugs are empty, they go into service to transport sap from tapped trees during maple syrup season. Now they’d be starting their third life — as ice lantern moulds.
Cutting off the top of the jug. The opening needs to be big enough for the ice to come back out again.
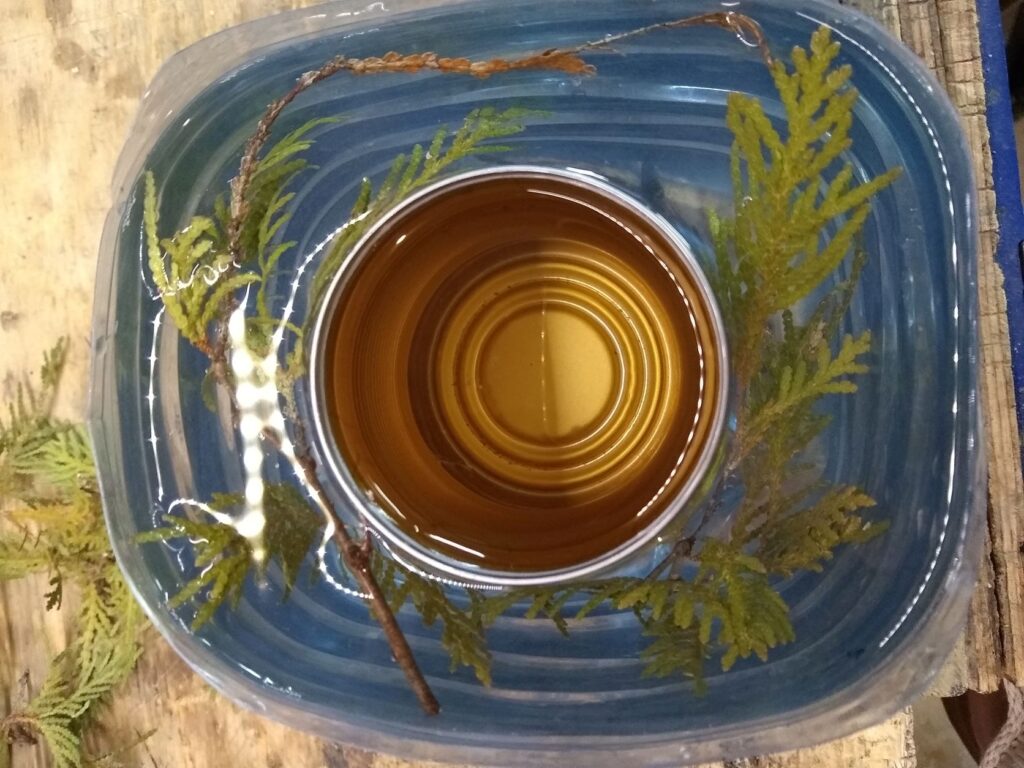
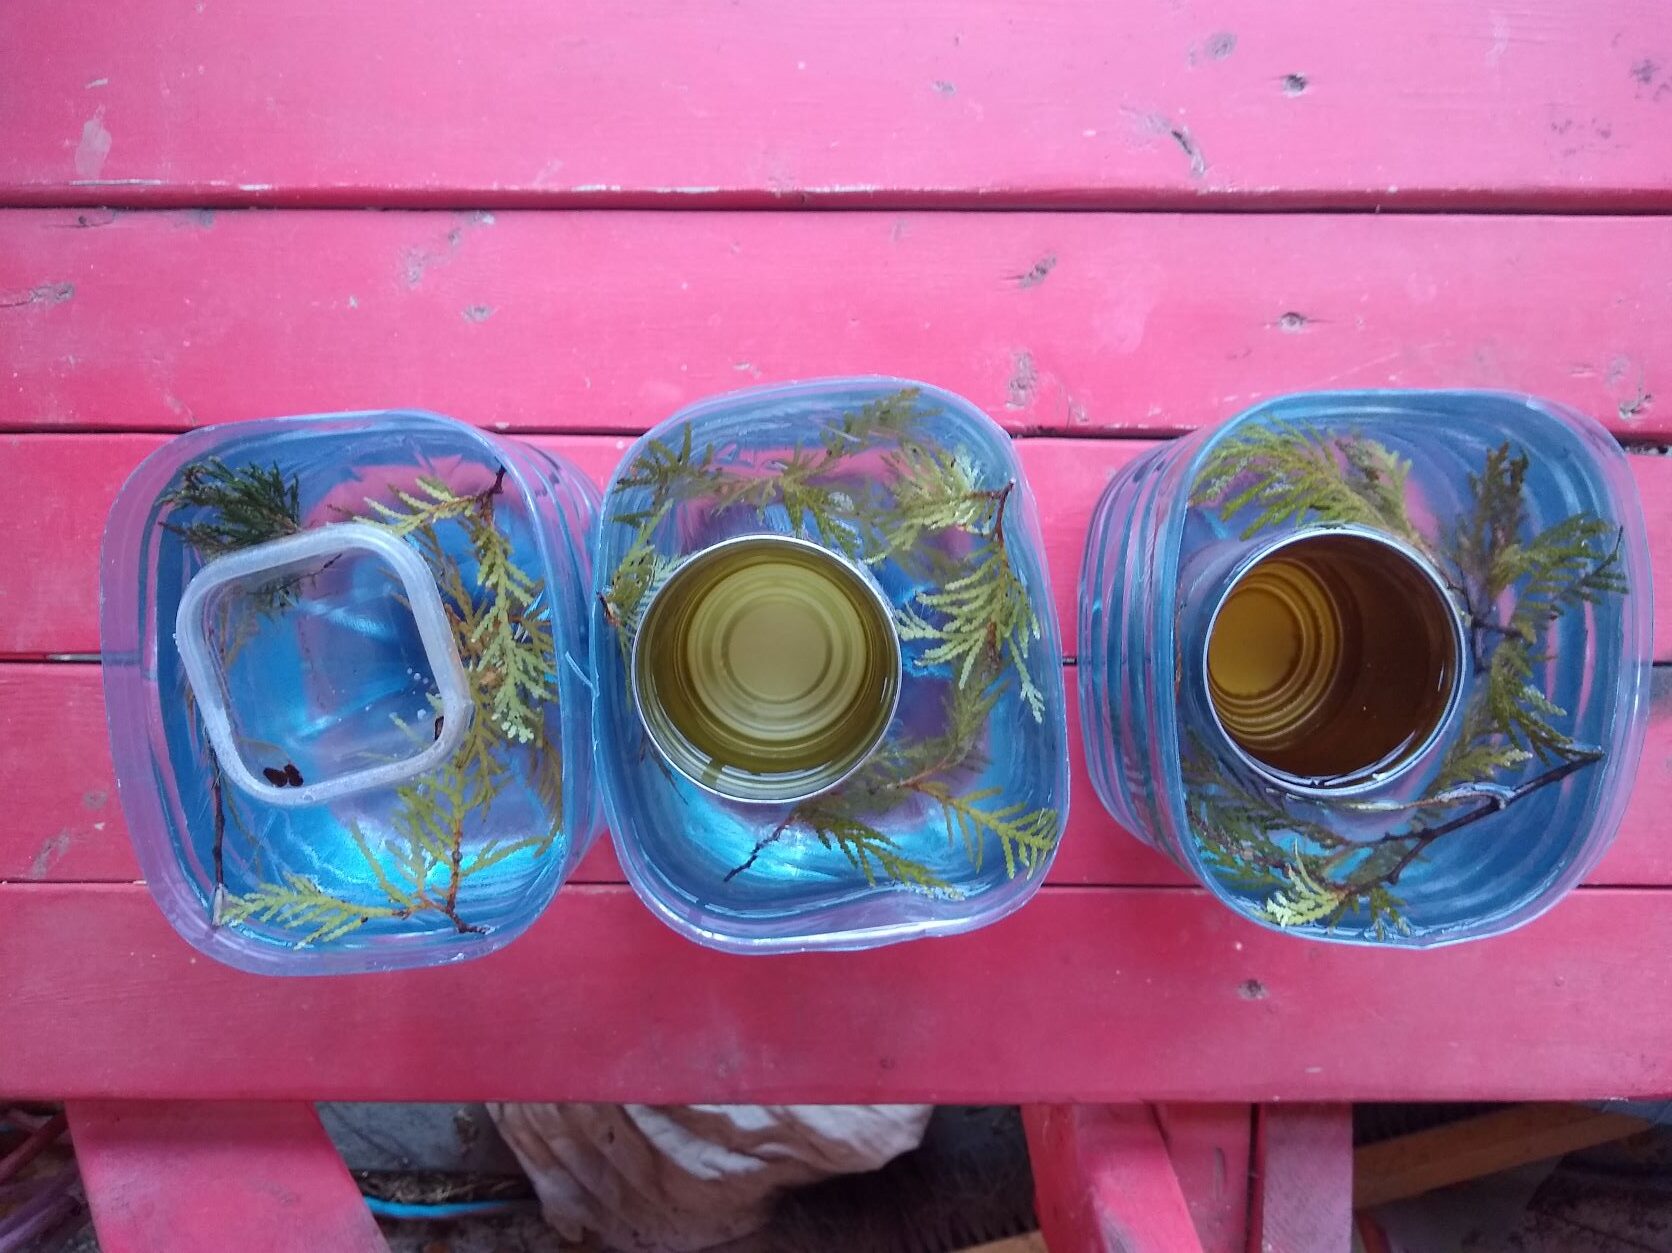
Step 2 was to find a smaller vessel to float inside the jug. This reserves the space where your candle will go. For this, I used an empty soup can from the recycling — which, btw, could later become its own tin-punch lantern. It’s DIY lanterns all the way down baby.
Your smaller vessel — the can, in this case — needs to be small enough that when both the can and jug are filled with water, the smaller vessel (the can) is floating a good distance off the bottom of the larger vessel (the jug). A good few inches. The role of the can is to reserve a space where your candle will go. If the can is touching the bottom of the jug, there won’t be any ice under the candle. Too little ice under the candle will also mean the lantern won’t last as long as it melts.
Fill both vessels — the jug and the can — with water.
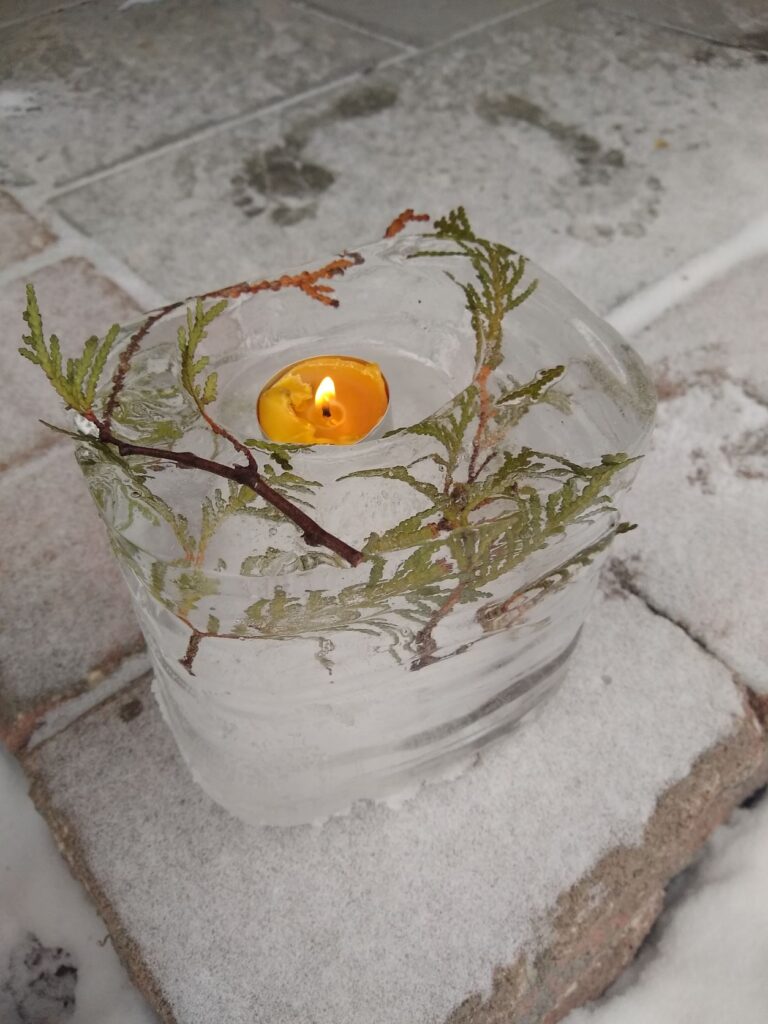
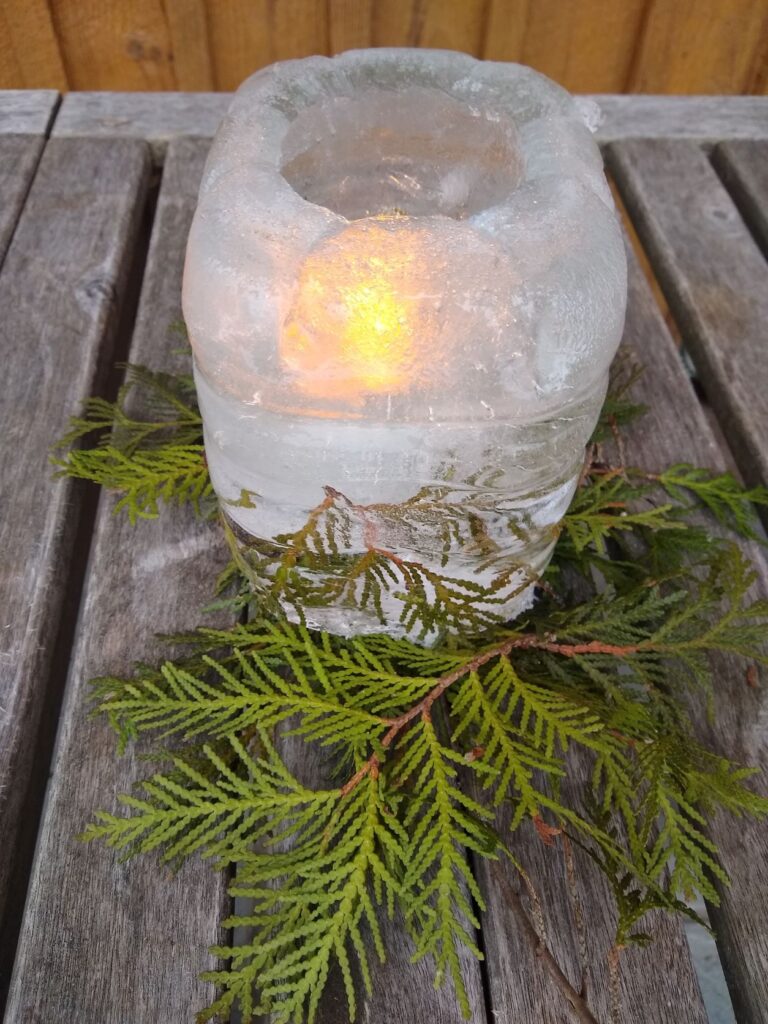
Bits of greenery or berries can be added to the water, to freeze into the lantern.
You can come up with little rigs using clothespins and wooden blocks to ensure your can remains centered in the jug. This wasn’t important to me because I didn’t mind if the candle wasn’t perfectly centered. But there are lots of tips out there to jerryrig something if this is important to you.
One of my bigger, sillier, a-ha moments in this project was realizing I didn’t need to space to freeze the lanterns in our freezer. I think the original Lee Valley listing said something about making sure you had sufficient freezer space for your moulds. So that just lodged in my head as The Way To Do It. But we only have a small chest freezer now, and only a fridge-freezer at the time, and – since I am part squirrel – our freezers are always full. My “a-ha!” was realizing that if it was cold enough outside for ice lanterns, it was cold enough outside to make ice lanterns. Boom. So I just waited until the forecast called for a chilly few days, and popped the moulds outside to freeze.
The plastic container I tried at left did work, but the tin cans made a much nicer depth.
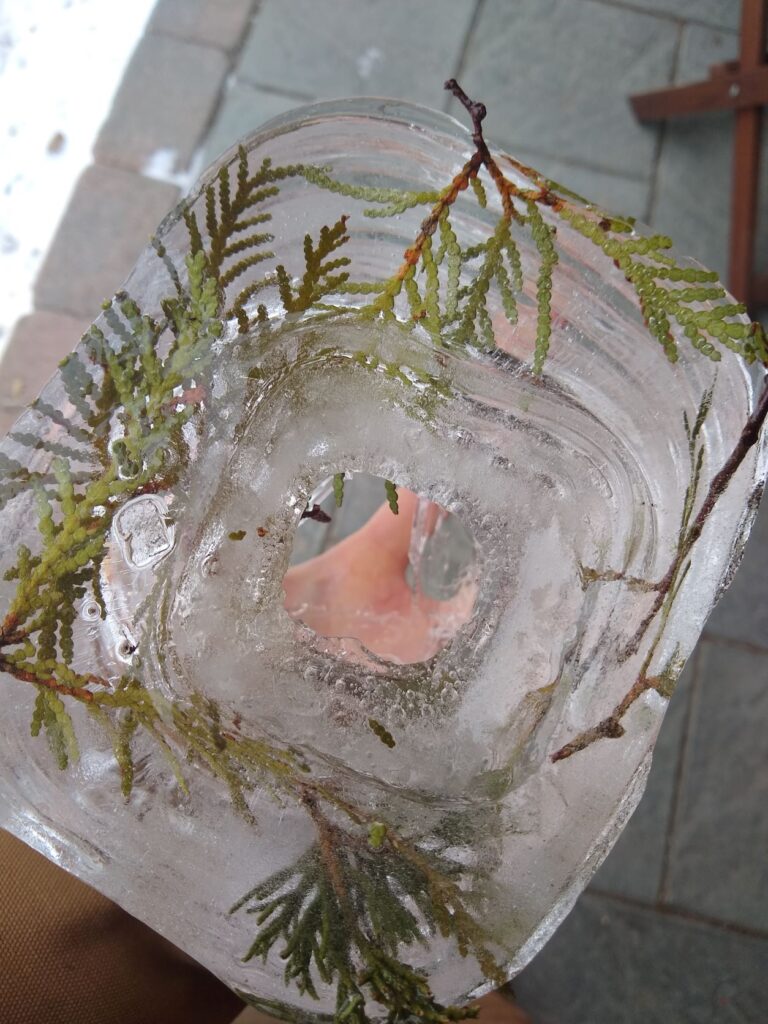
Though it was chilly, the temperature did fluctuate a bit, and the first time I tried to unmould the lanterns, though they seemed frozen, they hadn’t frozen completely. The space under the can was not frozen through, leaving an opening to the bottom.
Dang.
But being a maker is all about problem-solving and iteration. I realized I could just pop the semi-frozen pieces back in the moulds, pour more water through the hole in the ice until there was water covering the bottom, and leave them to freeze again.
Round two!
To unmould the lanterns, think of them like frozen popsicles — you just pour warm water over the outside of the mould until the inside becomes loose enough to pop out. The same is true for the can. I poured warm/hot water directly into the can until the ice inside the can melted, and then warm water into the now empty can until the can was loose enough to come free from the ice in the jug. An alternative I have seen is to put rocks in the can instead of water — just enough to keep it floating flush with the jug’s surface. This would mean you don’t first need to melt the ice away before you can warm up the can to remove it.
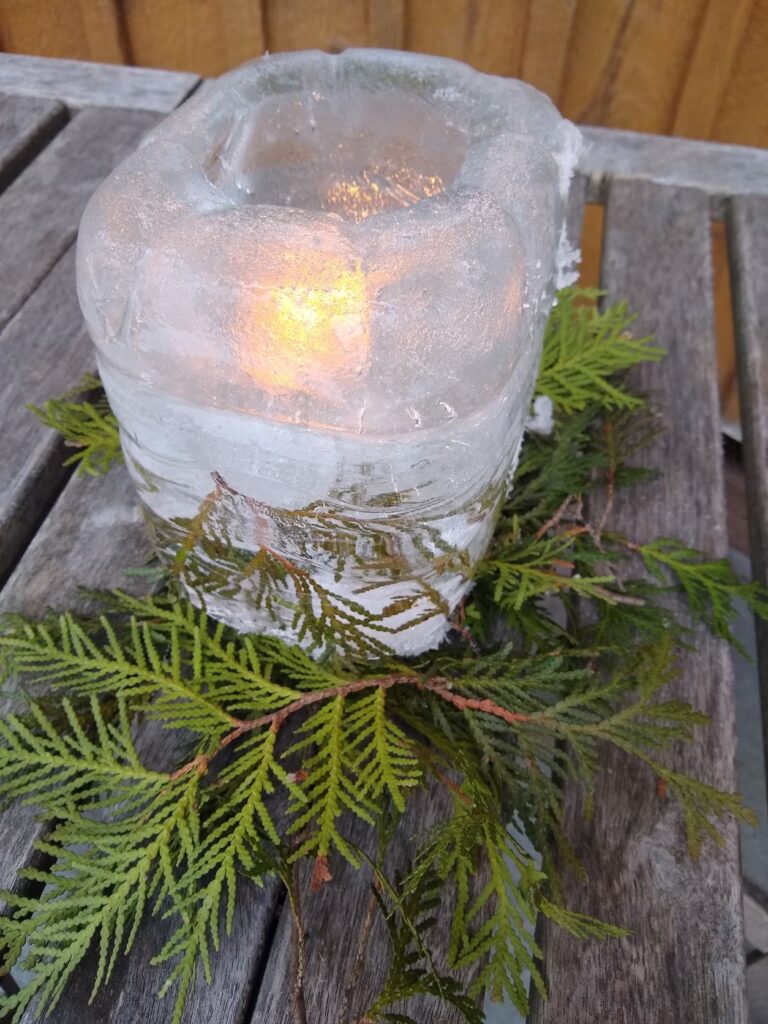
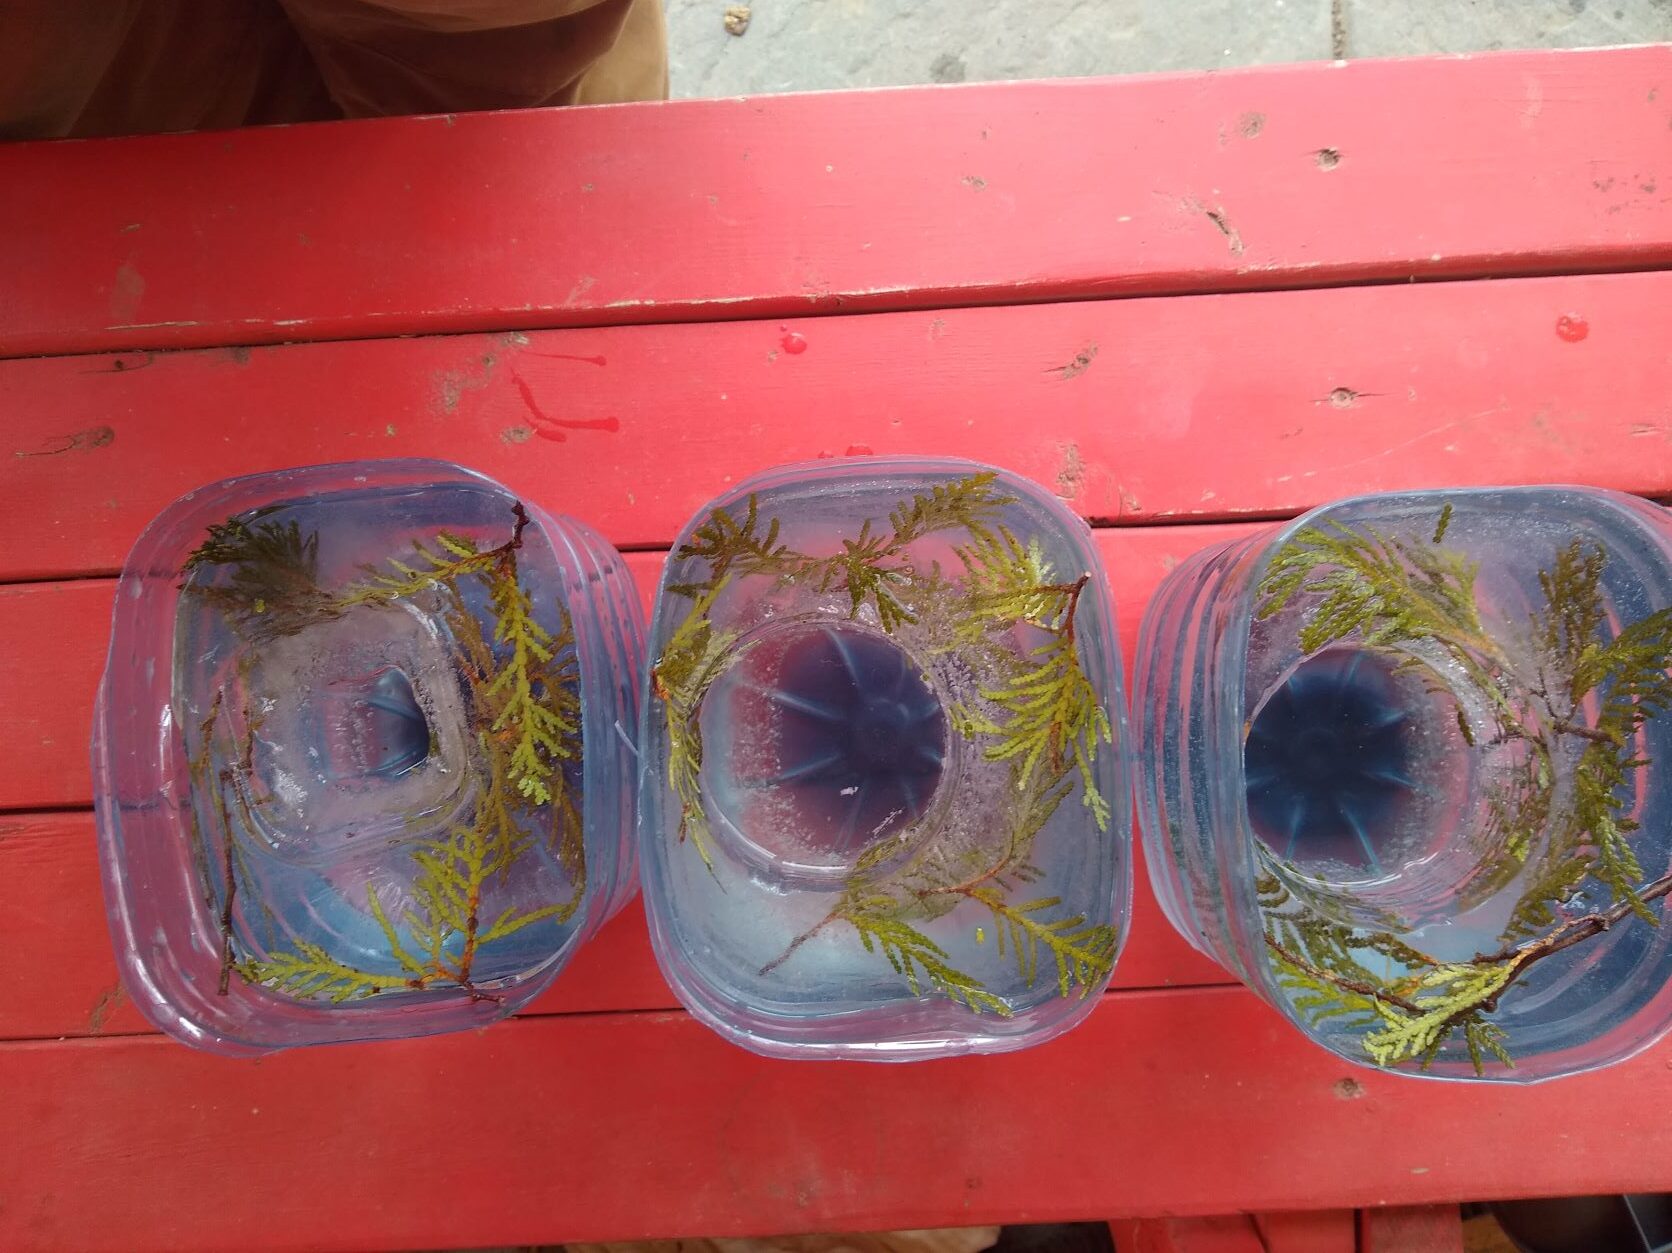
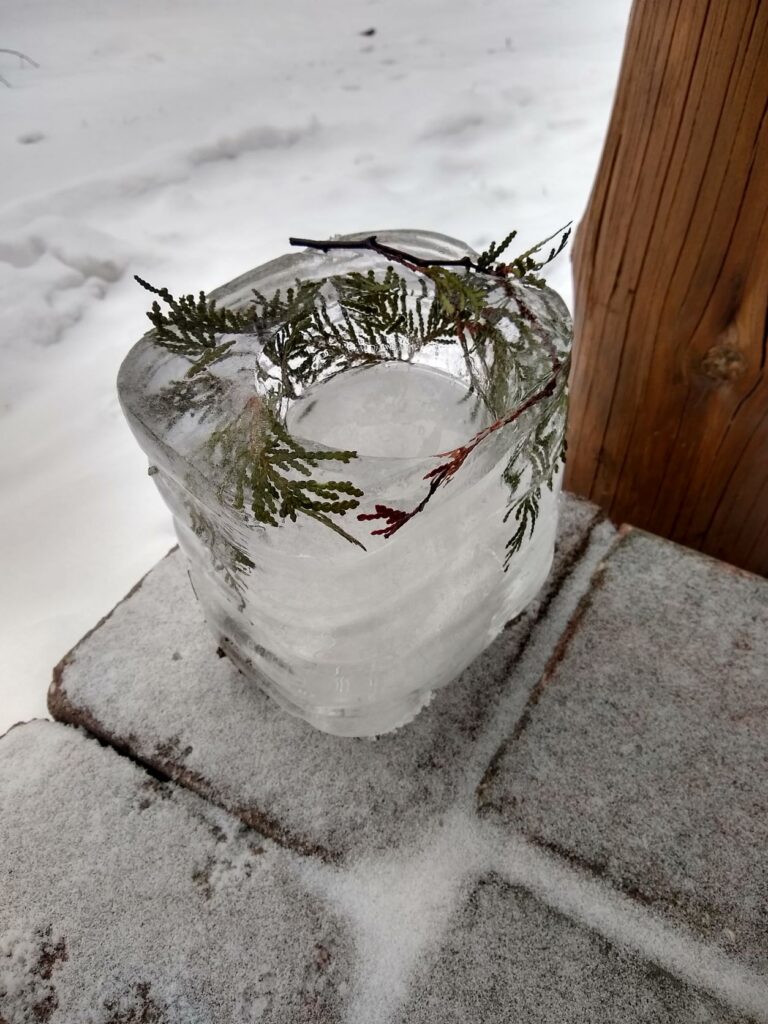
The second try was much more successful. And the trick to just refreeze the base worked a charm. The can popped free of the ice, and then the ice popped free of the jug. Add a tealight, and shazam!
The can leaves a space for a tealight
The tealight from above
The tealight through the ice
They look glorious at night.
And that’s it! A plastic water bottle, a tin can, a tealight, some water, some cold, and some time, and you’ll have your own ice lanterns.
I’ve always known I would like ice lanterns. But like everything homemade, the DIY ones definitely glow a little brighter. <3