 Maker's Dozen

My post-holiday internet rabbithole: watching watch restoration videos.
So tiny. So satisfying.
~Kate
With the cooler temperatures and some rain lately, I thought there might be some mushrooms fruiting in the woods, so I went to take a look.
 Oh… Oh my.
I sent this photo to my friend Miles (okay I sent it to a whole lot of people immediately) who asked if this is normal for our woods, such magical appearances.
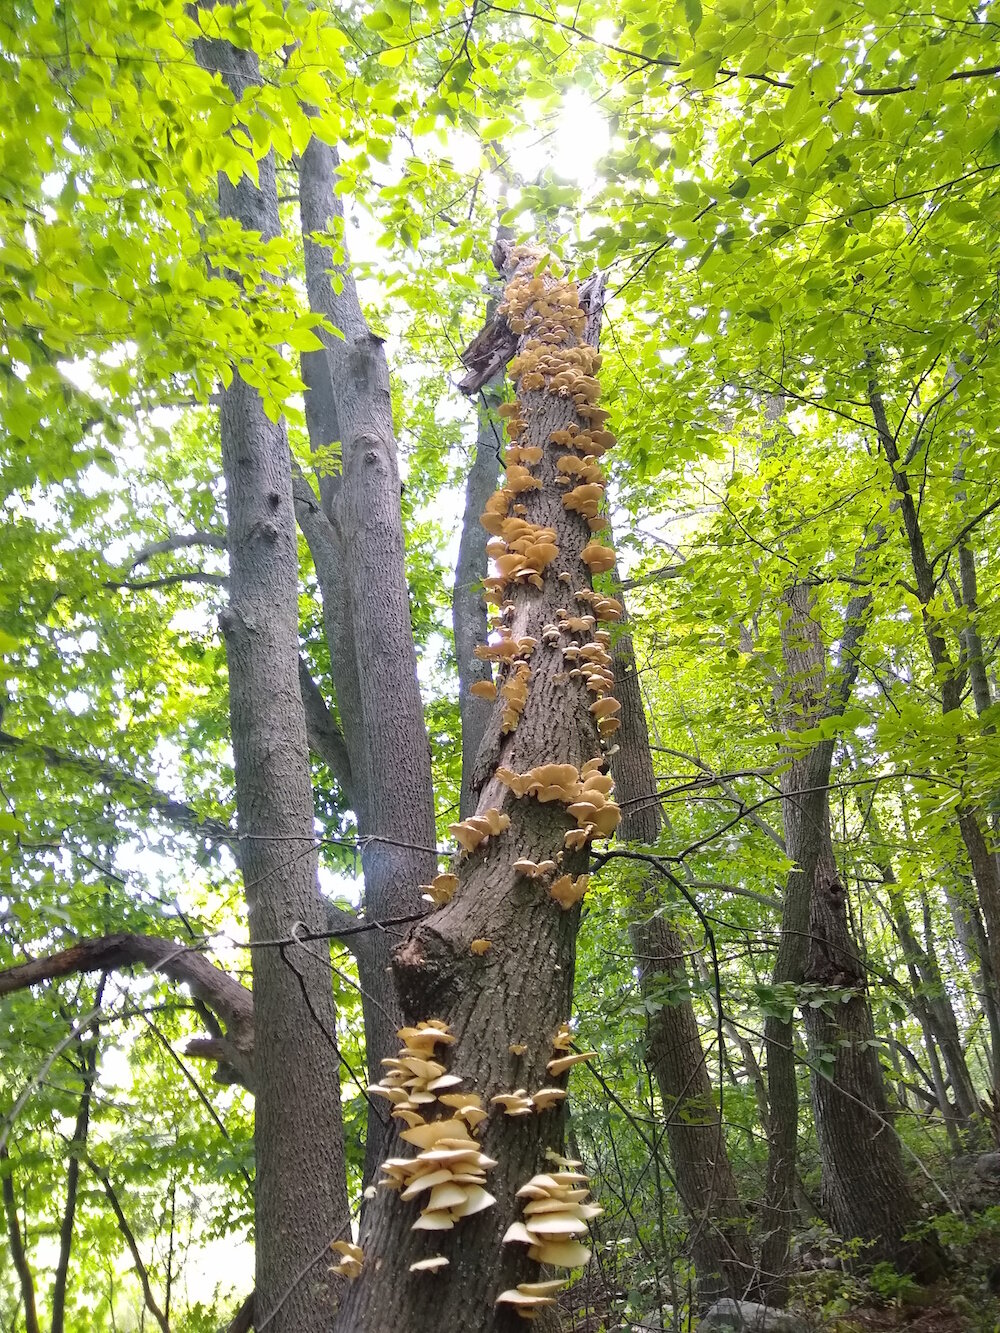
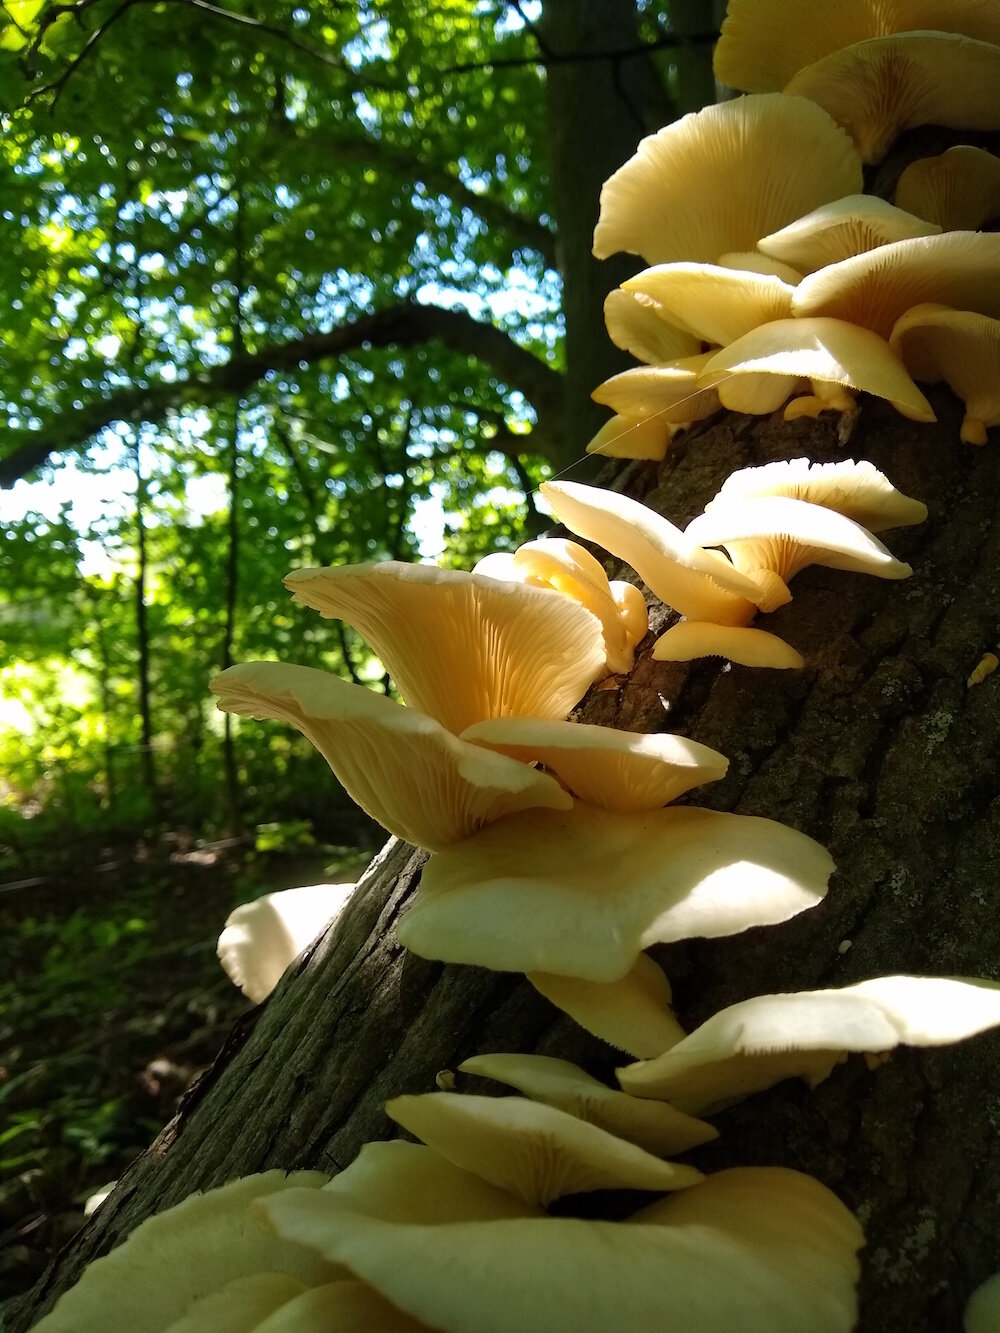
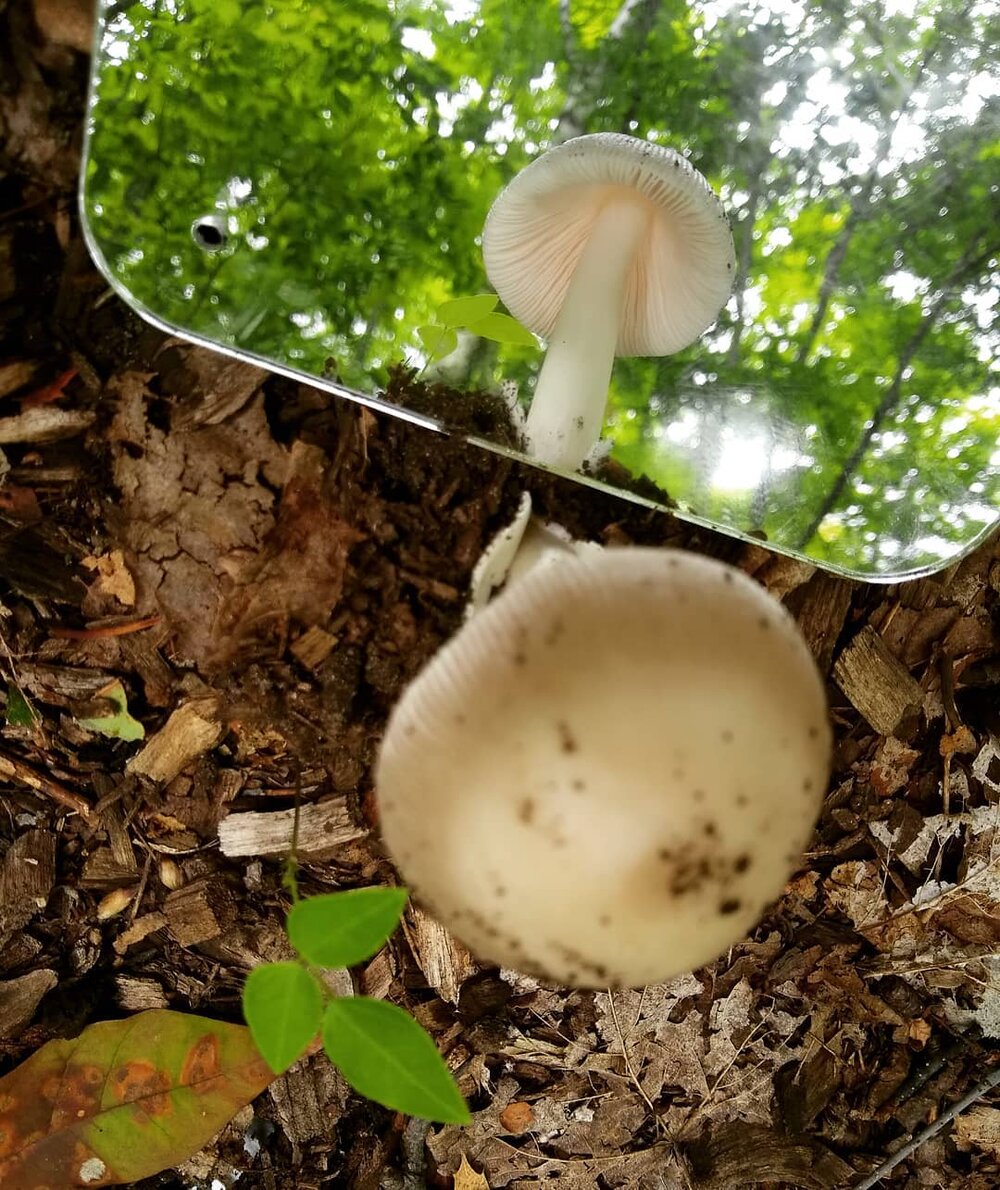
No sir, it is not. Magic yes. The woods are full of wonder, always. But this is the first time I have seen such a fruiting of mushrooms! Most of the fungi I find are one or two offs. If they are gregarious or abundant like this, they are usually not one of the edible species. I have spotted oyster mushrooms here before once or twice, but never in such abundance. Never like this.

Here are a few of the field ID characteristics that led me to ID this as an oyster mushroom (Pleurotus ostreatus). Oyster mushrooms are saprotrophic — they’re decomposers, fruiting on dead or decaying matter. It’s a little hard to tell from the photos here, but the tree these are fruiting on is a broken hickory. The tree snapped in half in a storm ages ago, and the top of the tree now hangs inverted from the trunk. It hasn’t quite broken free and fallen to the ground, but instead hangs on tenaciously by a few twisted strands of trunk. We often check after windstorms to see if it’s finally let go and dropped to the forest floor, but nope. Still hanging there. I guess the fungi respect that tenacity, and thought such a stalwart spirit would make a good home.
The cap and gills of these mushrooms are light in colour, the cap is moist, smooth, offset from the stem, and the fruits are attached in clusters by stumpy stalks (where there are any stalks to speak of). Very importantly for oyster mushrooms too is the gill attachment — instead of ending at the stalk, they are “decurrent”, which means they continue right on down the stem, not ending at the cap.
It’s well known amongst my pals that I am a real boring stick-in-the-mud about mushrooms. I loooove mushrooms, but I don’t nibble, I don’t dabble… I have a very short list of fungi I am confident enough that I can ID correctly (and which don’t have toxic lookalikes) that I am willing to forage and eat them.
It’s about respect not confidence. In mushrooming you go quickly from ‘knowing nothing’ to ‘thinking you know quite a bit’ to ‘realizing you definitely know almost nothing’. Fungi are endlessly fascinating and wonderful and complex. I went to a mushroom course where we spent a week harvesting and IDing fungi, and witnessed many very experienced mushroomers — including our two instructors — struggle to identify some of the mushrooms we found down to species. Respect the ‘shroom.
We’re going for a ride in the (electric) car little buddy.
I’ll explain in a sec…
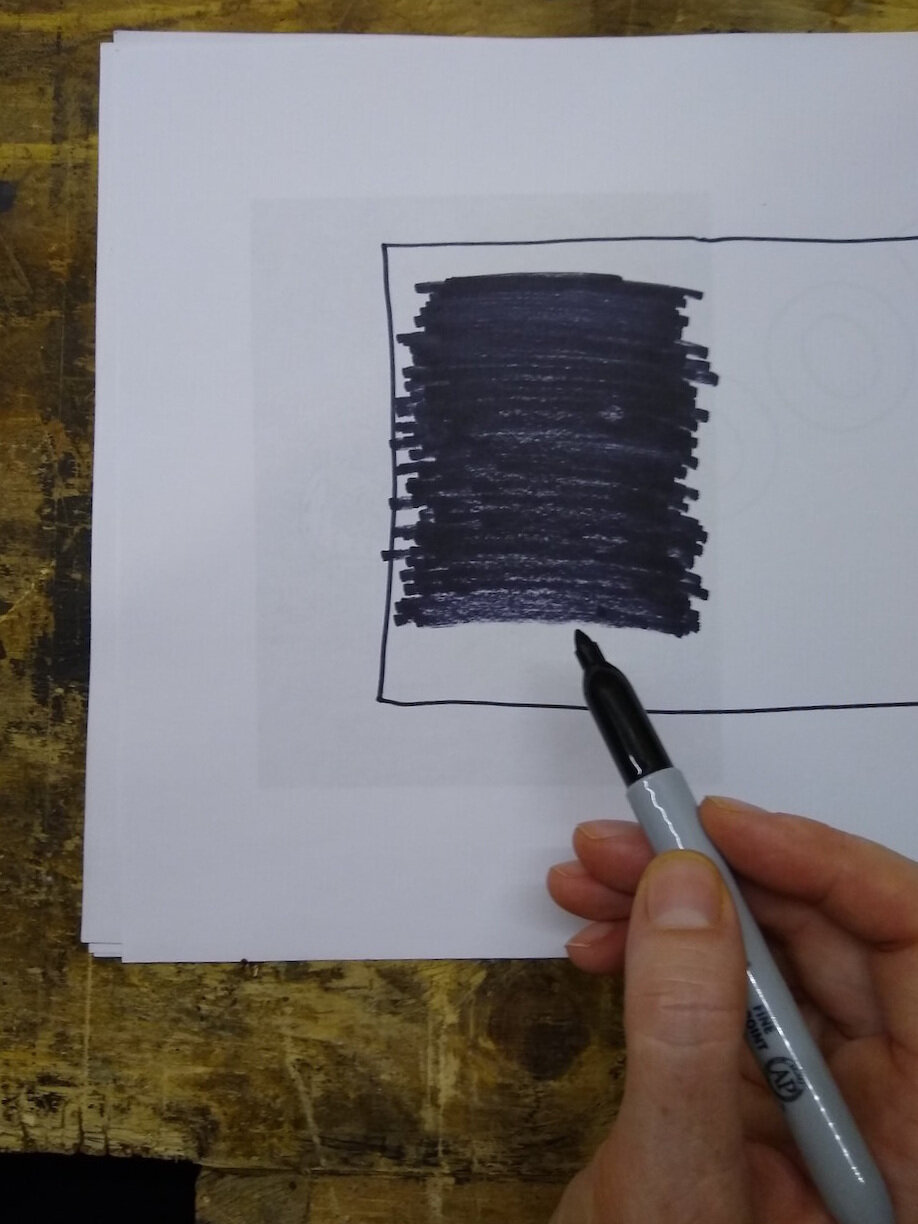
So in addition to a field ID, I brought a sample mushroom back to my “lab” (aka the workbench, with constructions projects hastily shoved to one side). Spore prints are incredibly useful to identify mushrooms. If this is an oyster mushroom, the spores it releases should be very pale — somewhere in a white-violet range.
To take a spore print, you remove the cap of the mushroom and place it overtop of a piece of paper, so the spores will fall from the gills/pores onto the paper where you can look at them. It works best if the cap is fresh and not too young, not too old. It can also jumpstart things to sprinkle a little water on the cap, before covering it with a container (I usually use a plastic yogurt container turned upside down).
The colour of mushroom spores can range from extremely dark, to extremely light. So you need to place any cap you’re checking on a material where either extreme will show up. You can of course buy “special” pieces of paper to rest your mushroom on that are half black/half white. Or you can get black and white cardstock and lie them beside each other (to reuse them, rest your cap on a piece of glass or plexiglass you place over the papers). Or, for a quick’n’dirty hack, you can do what I do when I’m in a rush, and just colour a section of white scrap paper with a black sharpie.

Now we play the waiting game. Patiently, cuz peeking might screw up the print. Go read your mushroom book for a bit.
A full print can take anywhere from an hour or two to a day. But if the cap is fresh, you may start to see some spores release sooner. I set a timer for half an hour and go do something else before I check at all. Mostly so I don’t sit at the workbench staring at an upside-down yogurt container, waiting for time to pass. Which has definitely actually happened.
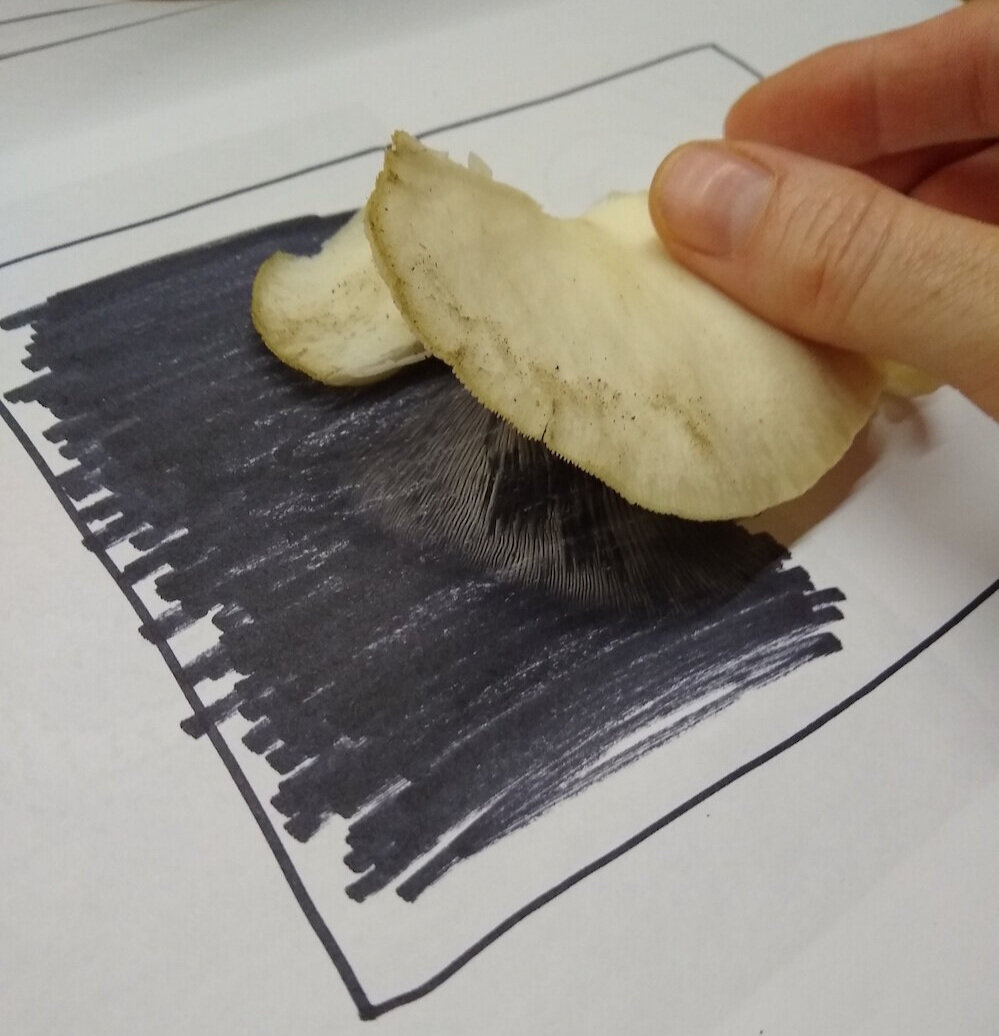
After about an hour, the spores of this sample had begun to release… and they were definitely light!
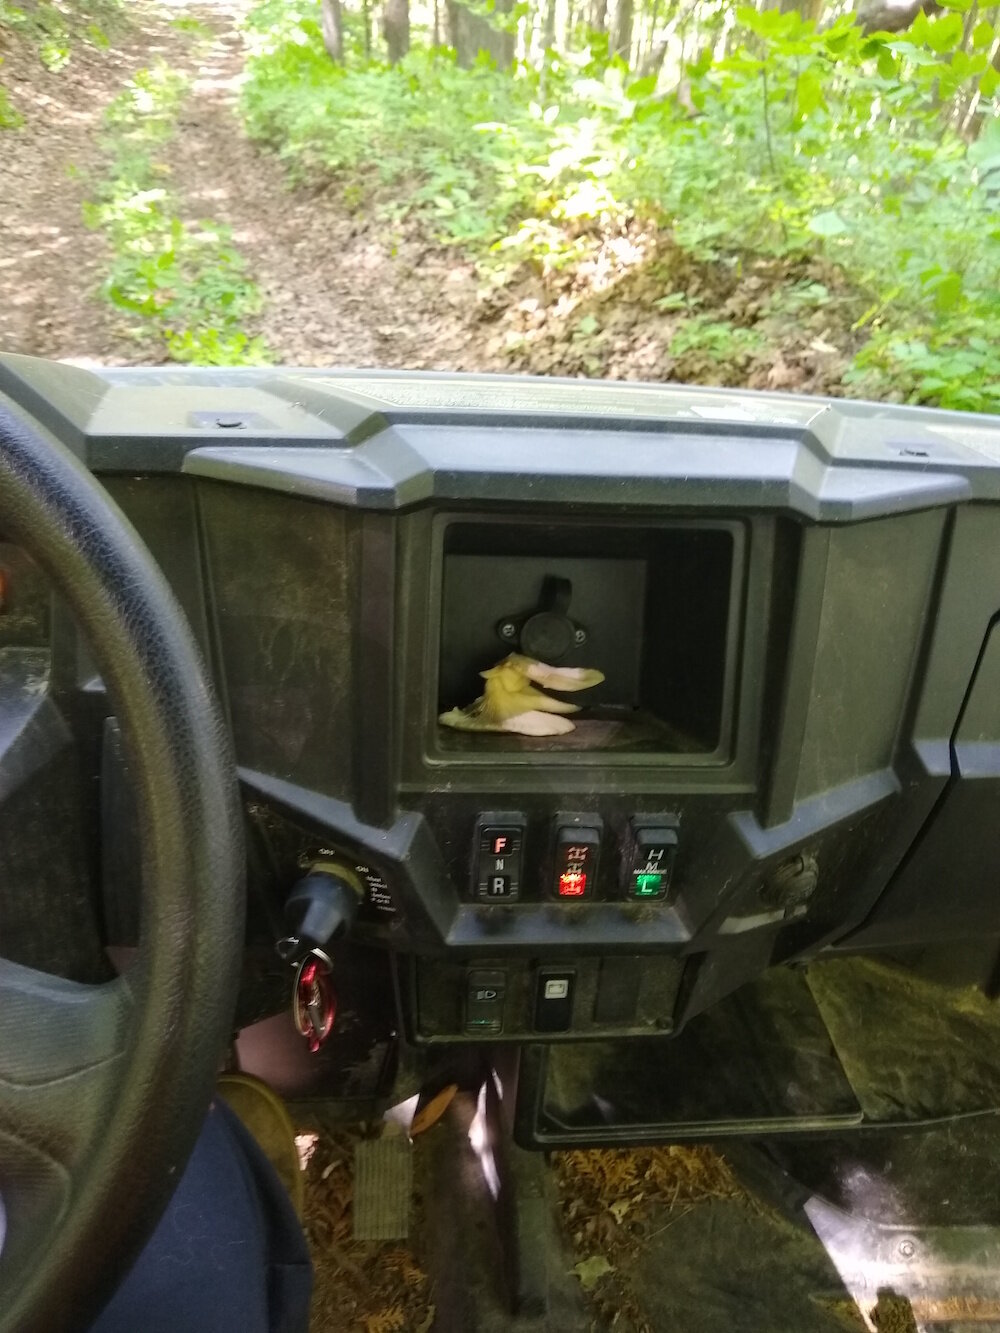
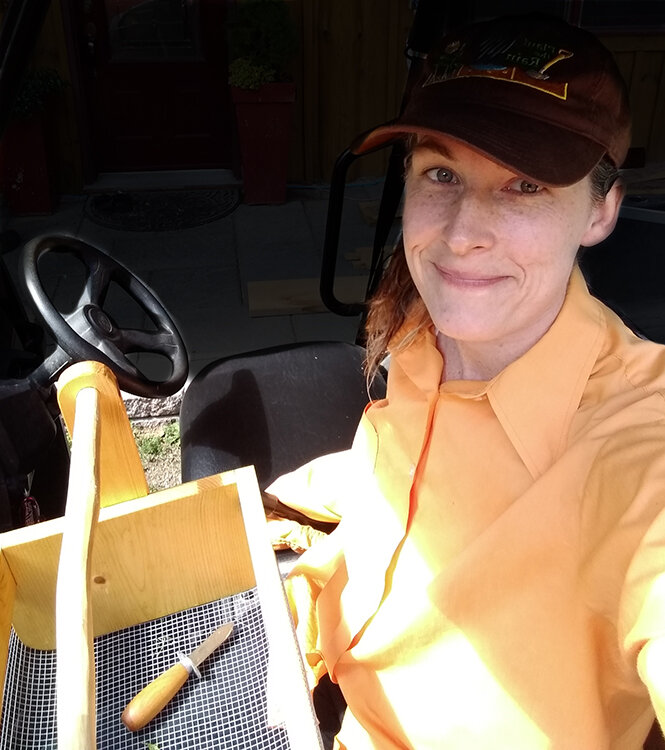
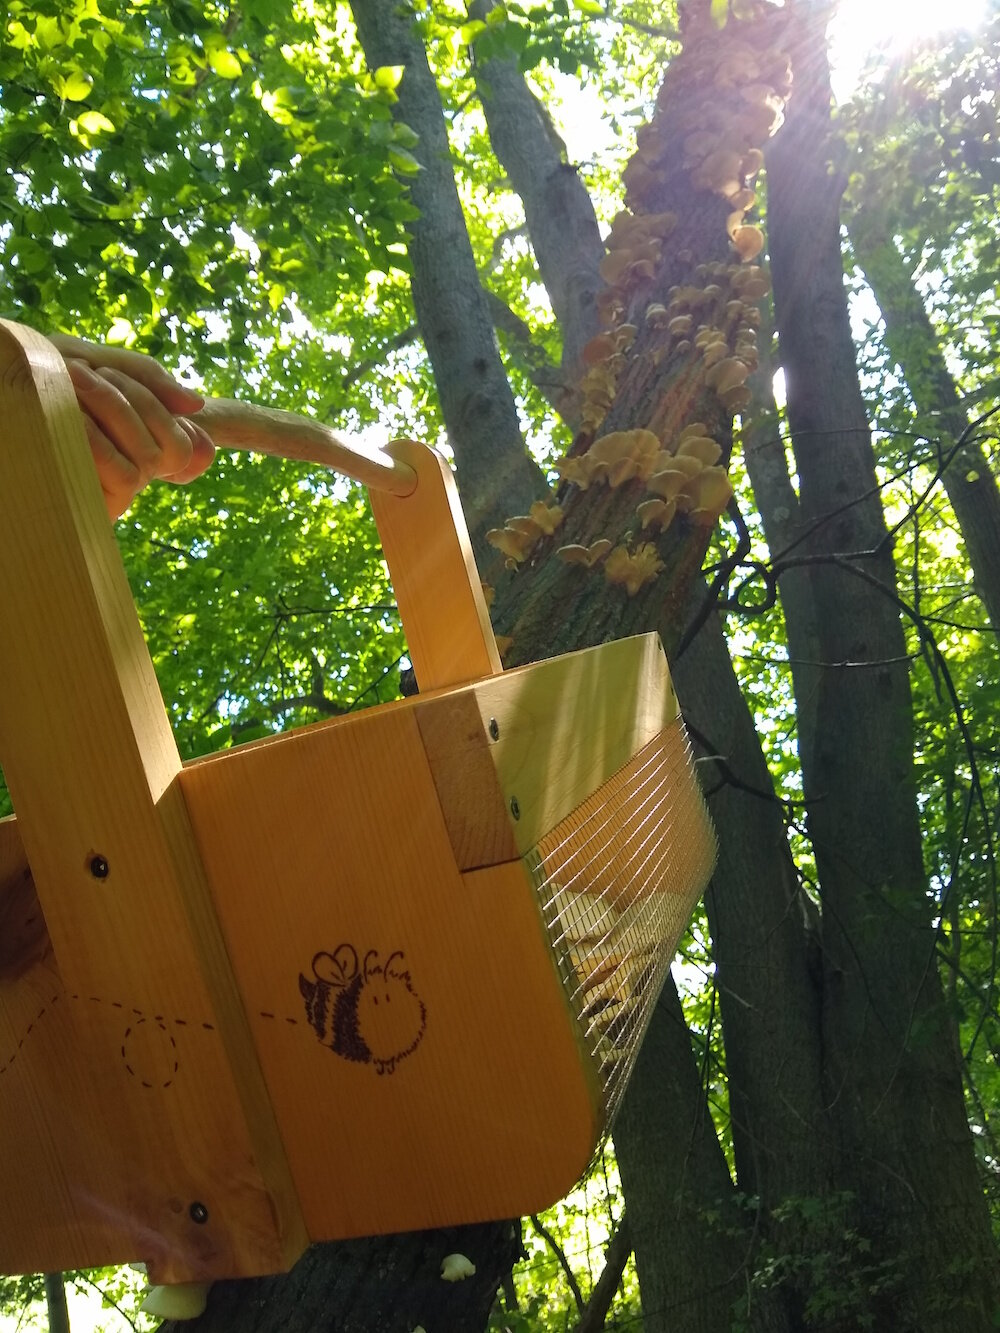
Time to fetch the basket! And the Neil.
No peeking. Okay a little peeking…

Bingo!! What a beauty. This is not a slice of the cap, it is just layers of the spores, fallen from the gills.
I’m fine. This is fine. The mushrooms will still be there. I love Neil I love Neil I love Neil…
Neil had been up for ages but hadn’t eaten, so he wanted to grab a quick bite before we went to fetch the fungi. He told me I could go ahead without him, he’d be about a half hour. Half an hour?! But something-something-shared-experiences-love-of-my-life-whatever. I could sit and stare at him eating his burger the way I stare at a mushroom cap I’m waiting to drop its spores. But instead I had a shower. Washed some dishes. Answered some emails. It nearly killed me, but I hung back so he could join me for the harvest too. Once I was done some chores, I waited in the UTV with my collection basket, which surprisingly did not help with my ability to be patient.
They were still there. Hadn’t scuttled off.
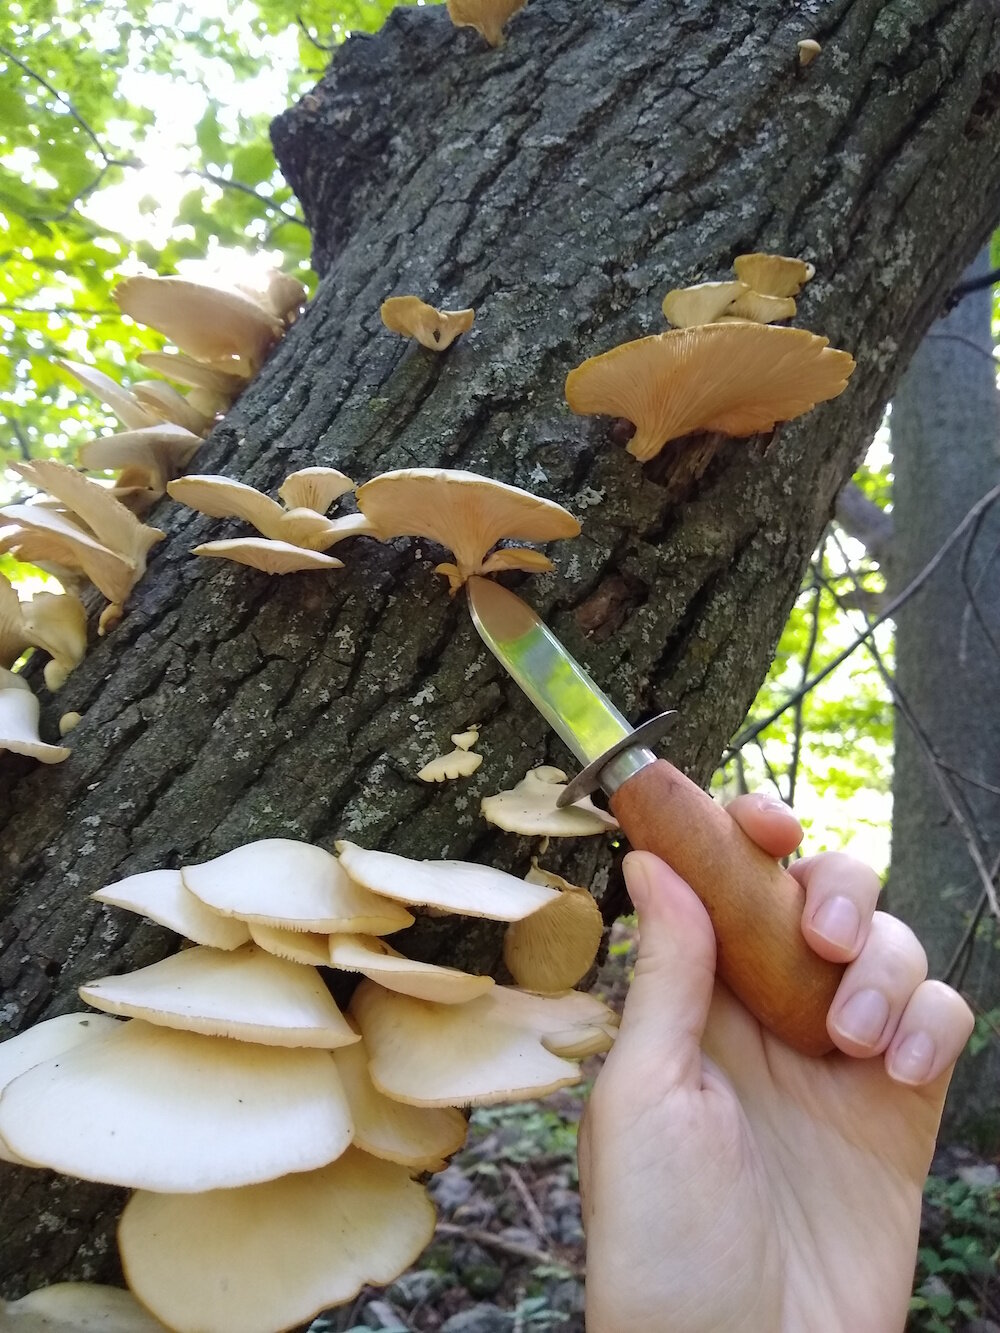
Yes that is an oyster knife. I think I’m funny. 😉 Buck-a-shuck.
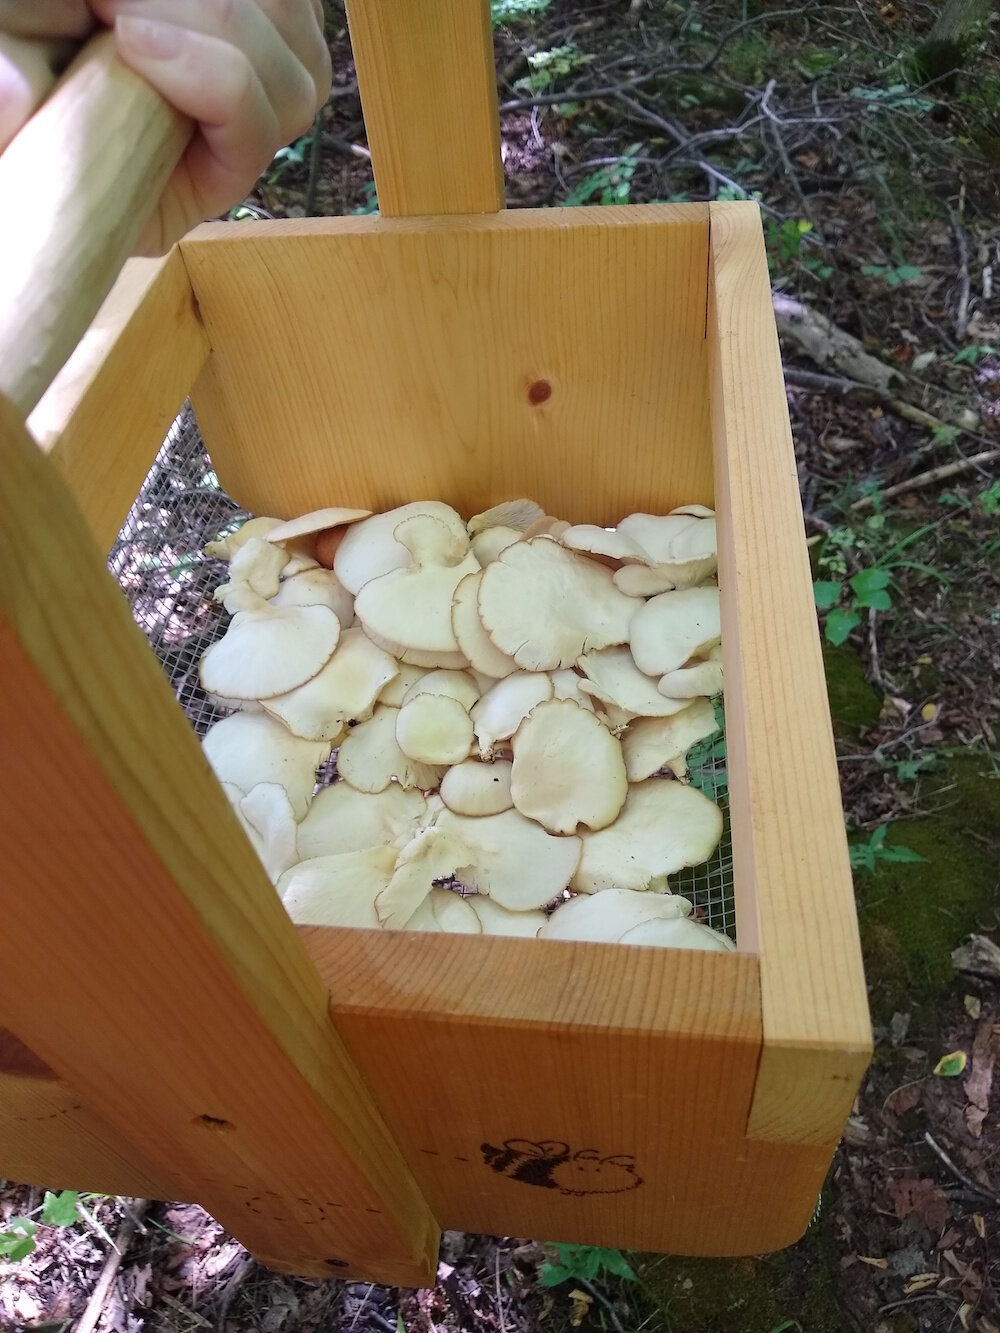
Now’s the part where I make it super-duper clear that I’m not advocating you eat mushrooms that you think look like this. Even if a mushroom you find matches all the descriptions I’ve mentioned, you may still have an adverse reaction. Your body, your biome. I am an enthusiast, but an amateur. I only risk myself — and apparently Neil, who for some reason trusts me with his life. Even so, even with a confident ID of a mushroom without toxic lookalikes, we still only start by eating one. Then we wait a day to make sure we’re a-okay before eating more. Your risks of any major issues with mushrooms are way lower if you don’t pig out. We fried a couple up this morning to test, put some aside for an epic funghi pizza on Friday, and dried the rest for another day. (If we die, we’ll let you know.)
“…many people are armed with more enthusiasm than knowledge, so there is always a risk of poisoning from mistakes in identification.” ~George Barron, “Mushrooms of Ontario and Eastern Canada”
There absolutely are deadly poisonous mushrooms that grow in Ontario — I have IDd some toxic Amanitas here in our woods. Some toxic mushrooms are widespread, and they are often white and don’t “look” scary at all. Cooking mushrooms doesn’t necessarily make them safe to eat, and some of the most dangerous mushrooms will not make you sick right away. If you feel ill quickly after eating a mushroom, those aren’t even the really dangerous ones. You’ll be uncomfortable for awhile, but you’ll probably live. But mushrooms that have amatotoxins can cause serious and permanent damage to vital organs like your kidney and liver, and you’ll only start to notice the effects from those mushrooms 4 to 24 hours after you eat them. Be humble, be patient. And if you are not 100% sure, don’t eat it.
“Every mushroom is edible, but some are only edible once.””
This is the tree *after* we harvested. Also this might be the most beautiful thing I have ever seen.
We harvested what felt like a lot, but was just a fraction of what was there. Life wants to be abundant, our only job is to not mess it up. The rise in interest for foraging both delights and makes me nervous. It delights me for humans to reconnect with nature, but not when we’re just taking our overconsumption to the forests. Take a few, leave many. Or take none — also a wonderful choice. It’s always okay to just enjoy with your eyes, not your belly.
Harvesting with mesh and open baskets lets the spores disperse as you walk in the woods, helping ensure there will be more mushrooms in the future.
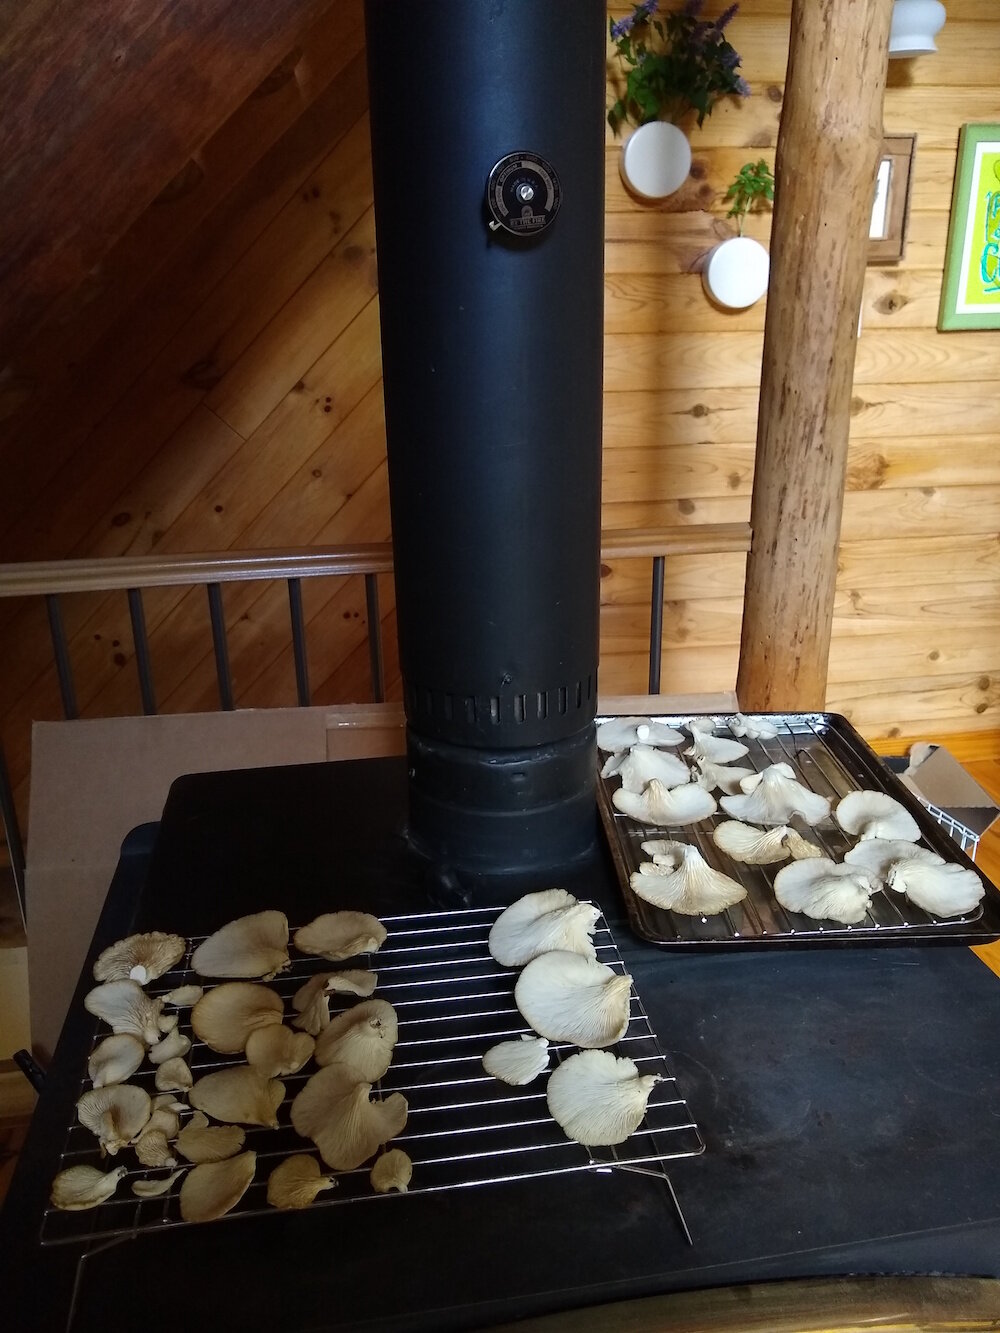
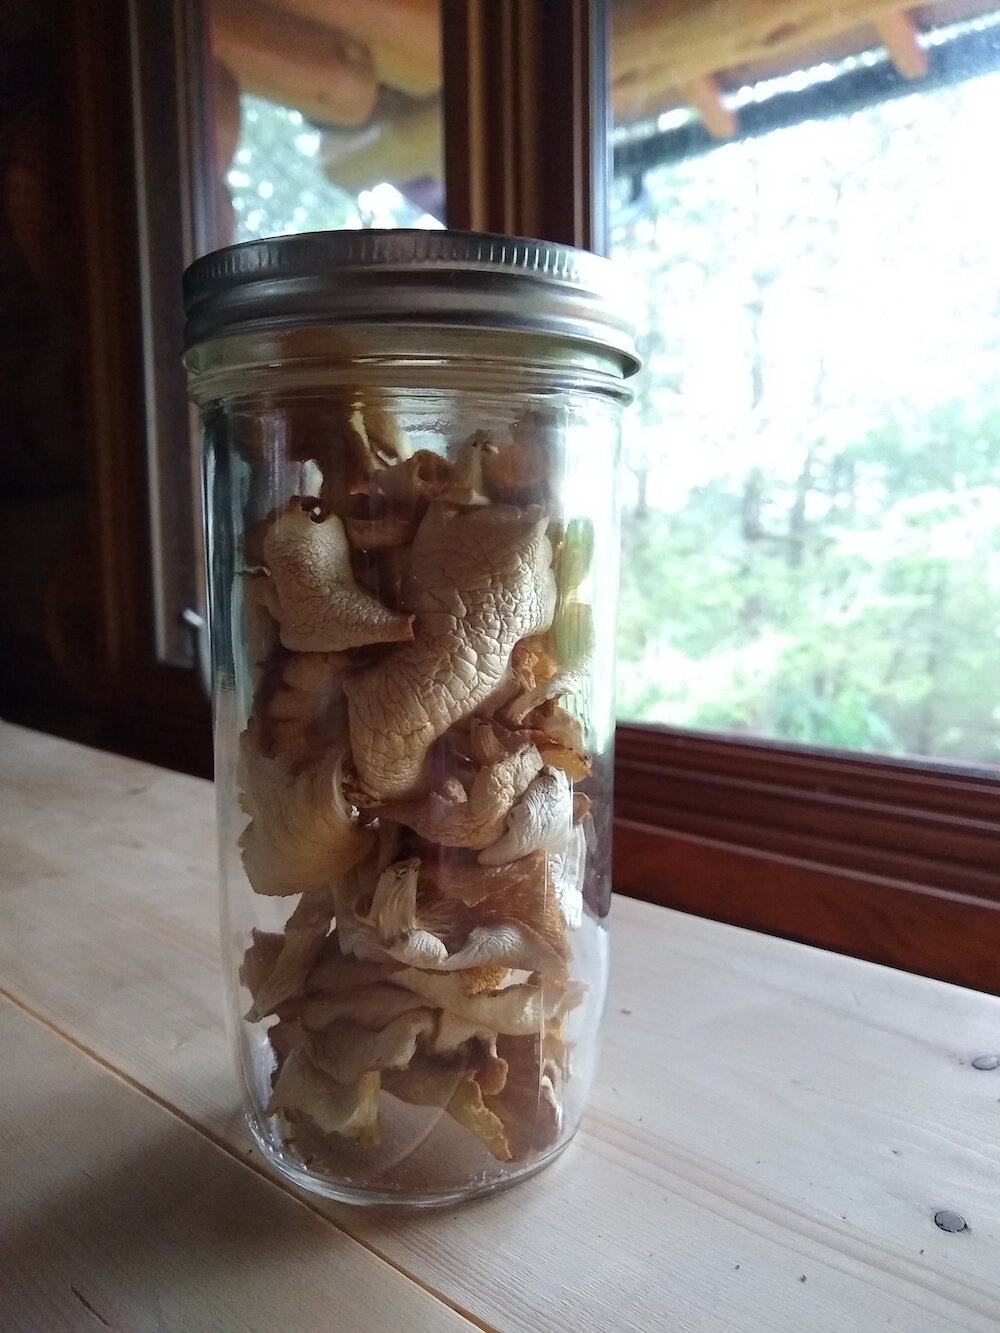
Air drying some of the mushrooms… and giving the bugs a chance to move out.
Foraging for these mushrooms felt like many bits and pieces of our lives here coming together in a fungal symphony. To know the woods well enough to know good times and locations to look for mushrooms. To ID the tree they’re growing on, and the mushrooms making that tree their home. To harvest wild foods, but not too many, and to dry and store a little wildness for later. We work really hard to learn and learn and learn, and it’s nice sometimes to taste the fruits of our labour (what I did there, you see it).
hanks woods, as always. See you soon.
>~Kate
“Sometimes I get up early and even my soul is wet.”

Sometimes I get up early enough to watch the sunrise. Usually deliberately though usually not “naturally” — I will set an alarm so that I can meet the day, literally. Most often I do this during the fall or winter when, not as now in mid-summer, sunrise is at a “reasonable” time. More like 6 or 7AM instead of more like 5AM.
In researching the correct time for this alarm I learned “sunrise” is not what I thought it was. I would check the internet for tomorrow’s sunrise time, get up, and find the sky was already bright. How had I missed it?
It turns out that if I wanted to watch night give way to day, what I was really looking for was one of the dawns. There are three of them, and though I enjoy all three, the time I was looking for was the last: “Civil Dawn”.
Each day begins with three dawns, and three twilights. Astronomical, Nautical and Civil. Each dawn is an exact time. The dawns mark the moments the geometric centre of the sun is a particular number of degrees below the horizon (18°, 12° and 6° respectively). And each dawn is followed by its twilight, again Astronomical, Nautical and Civil. The end of this dance is sunrise. The same twilights happen in reverse order each evening, but beginning with sunset, and with three dusks replacing the three dawns. (To learn more — read here.)
Astronomical twilight is still a dark-dark. Black as night. But it is when the sun is nevertheless too near the horizon for us to see some astronomical features — it’s when the brightness of our sun obscures some of the other stars.
Nautical twilight is the time for sailors. When the sky is bright enough to be able to see where the sea meets the sky, but still dark enough that the stars used for navigation are visible in the night/day sky.
Civil twilight is the time for me. When it is not “bright as day”, but “bright enough” — bright enough that we lunky bi-pedal bi-nocular apes are able to get around without artificial light.
Civil dawn and civil twilight is a fascinating time to have your eyes open, and be navigating the world. As the moments pass, you can nearly feel your irises stretching open to take in each new spec of light. The world brightens around you. The sun is turning on the lights.
~ Kate
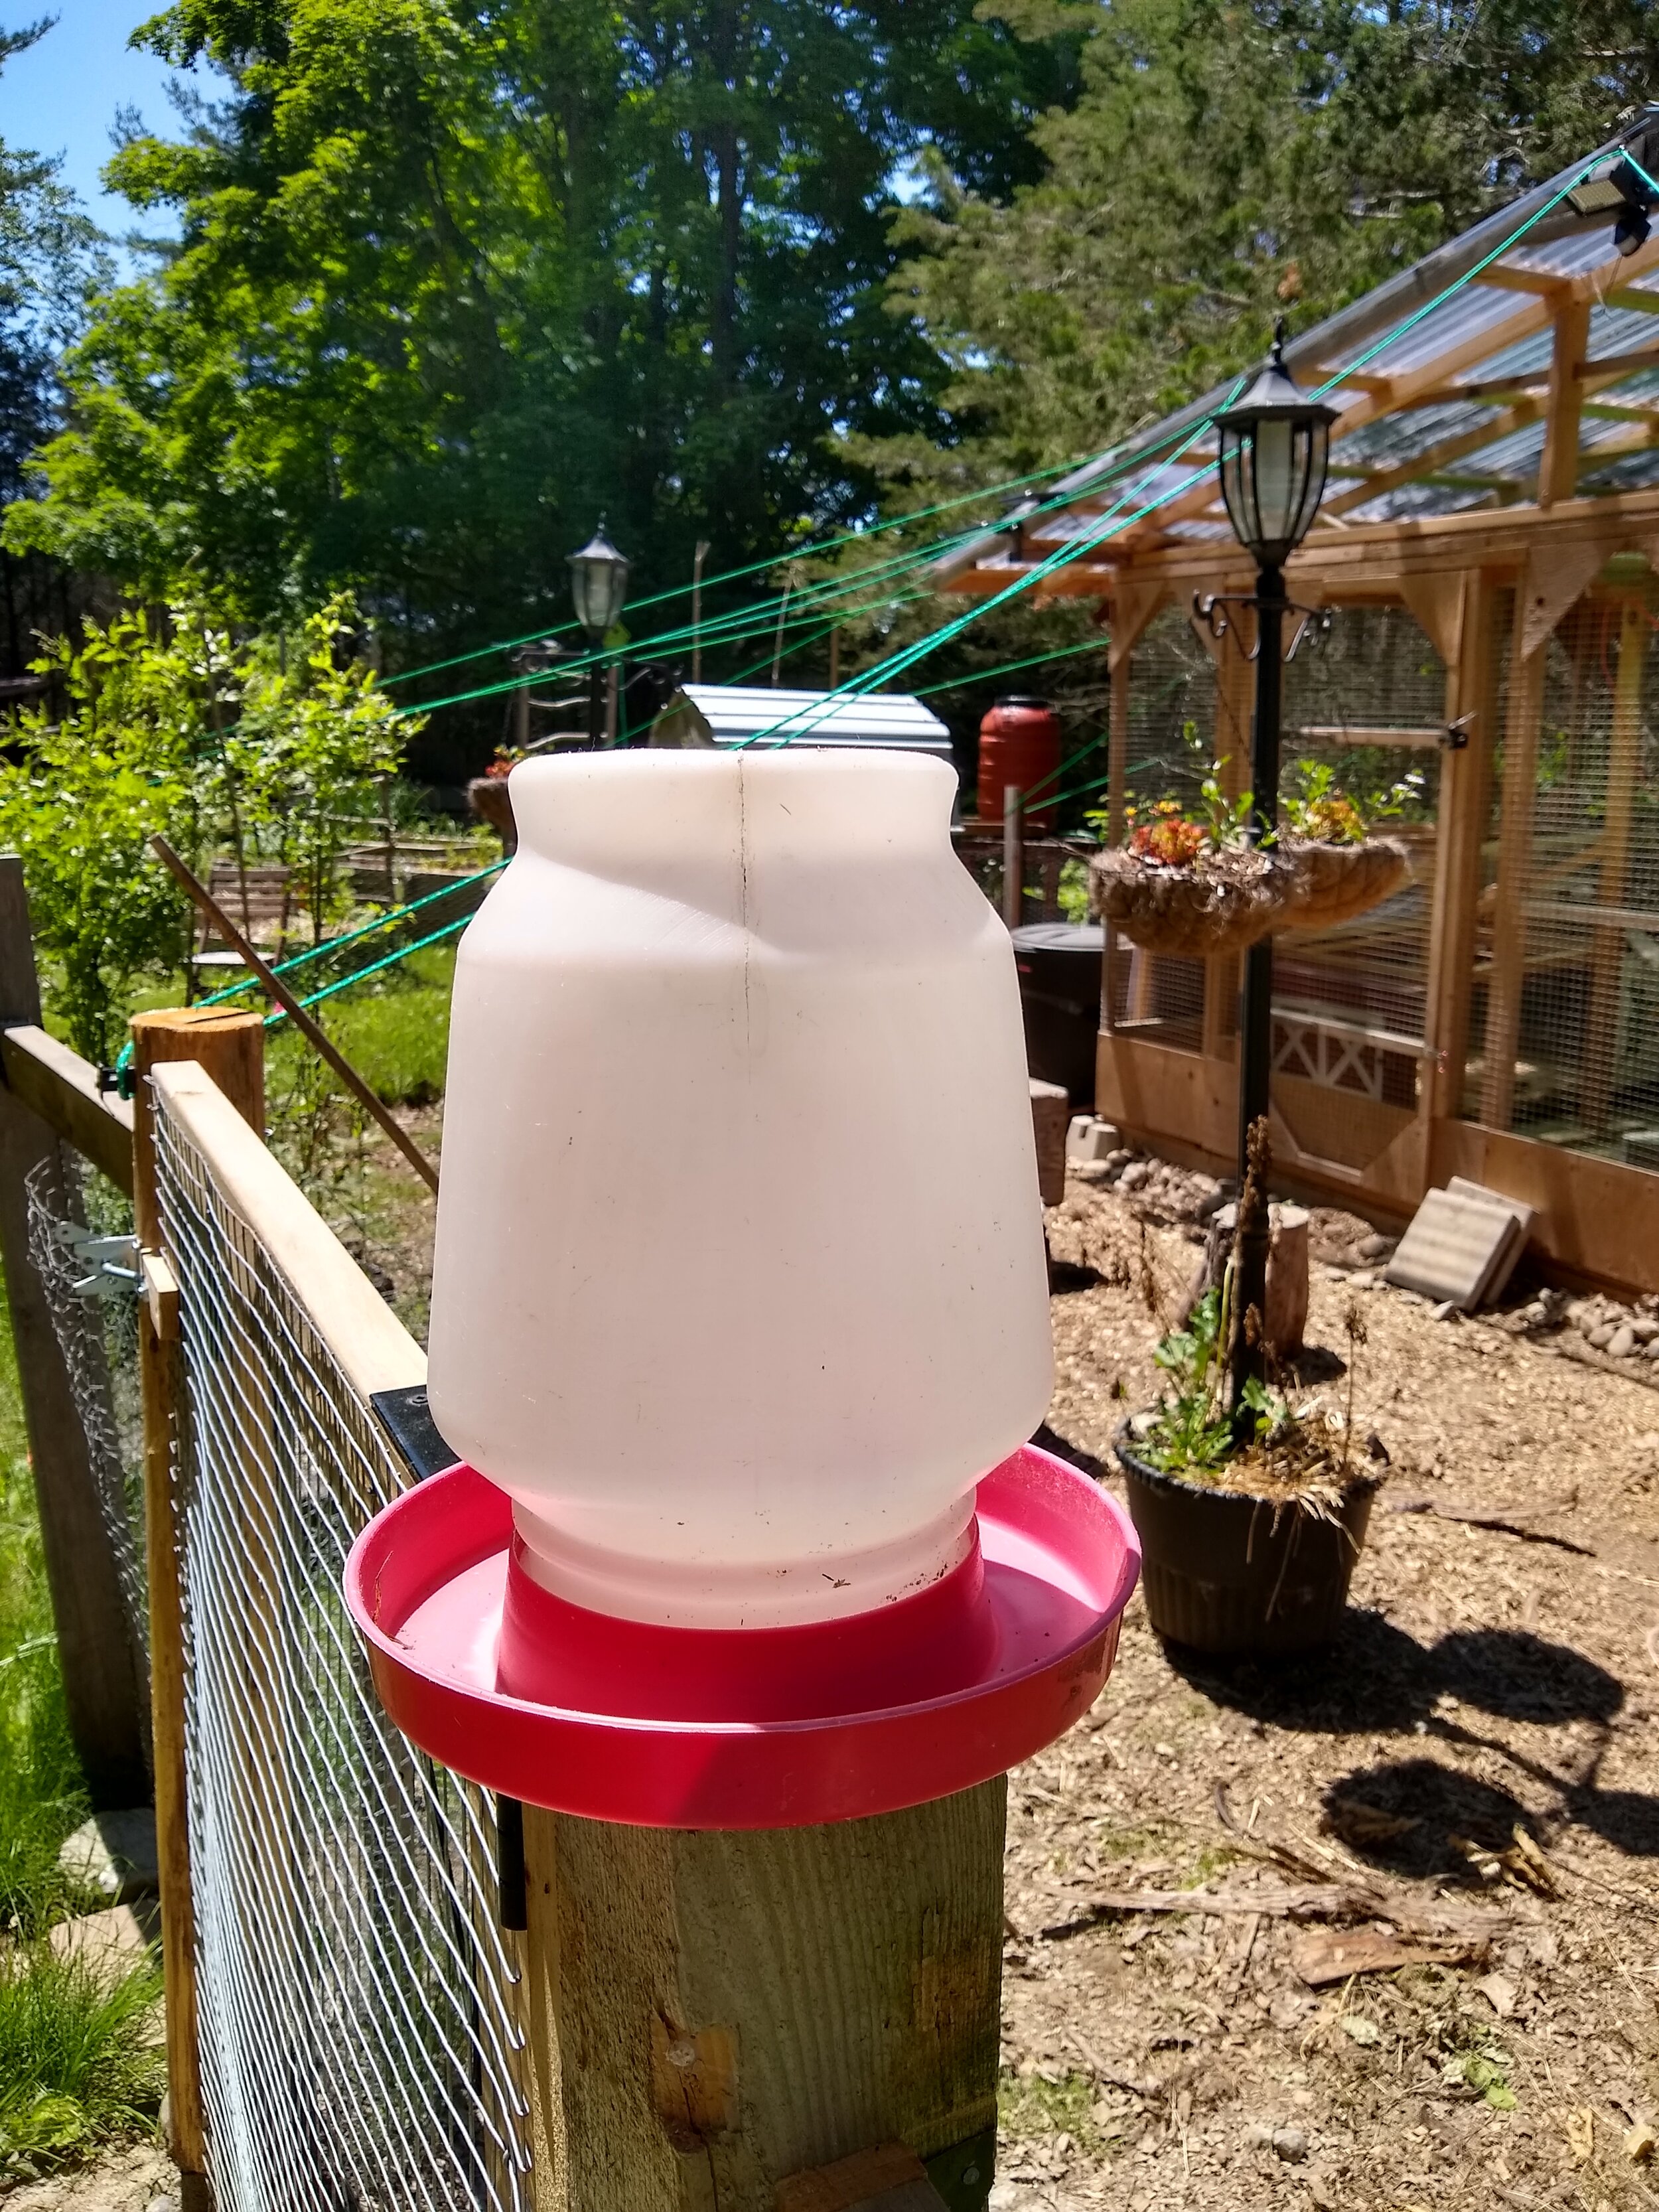 Chickens: “Thanks Bipedal Female Food-And-Water Dispenser, but do you have anything with more dirt in it? ktks”
Chickens make terrible farmers. They literally live like there’s no tomorrow. See a sprout, eat a sprout. Tomorrow be damned! Live for the now!
Party animals.
But we’ve managed to turn our chickens into gardening allies, in spite of themselves. We change over our chicken waterers every day or so. Though a chicken’s favourite water is always the grossest, dirtiest, mudpuddliest, most-recently-pooped-in water they can find, we like to feel we’re at least giving them the option of drinking fresh clean water. From there, they can do whatever their little dino hearts desire.
But chickens don’t drink a full waterer every day, so that means we are frequently removing a 2/3rds full waterer from their run. Rather than dumping it down the drain, we either consolidate it into the previously mentioned “ugly flushing buckets”, or use it to feed the gardens. I like to grow a few plants in the chicken run which are safe for them to nibble — assorted herbs, and some leafy greens like kale. I also grow roses in there, which are able to defend themselves against the chickens. Roses provide a nice bit of greenery in the run that can hold up a chicken’s reign of pecking terror. And since they’re out of chicken reach/interest, I’m able to harvest the petals and rosehips. All those plants get watered with the chicken waterers. I will turn you into gardeners yet, you tiny defoliating monsters.
We often joke that we only build structures so we can put rainwater-collecting roofs on them. It’s not “true” but it’s also not-not true. Both our chicken run and our front firewood storage have roofs on them, with the roof water diverted into rainwater barrels. We use this water for outside chores. As-is, it’s not potable (though we have plans…), but it is great for a quick wash of muddy feet, cleaning out the compost bucket before bringing it back inside, or watering the vegetable gardens.
It’s easy enough to pop a gutter on a roof. Instead of ending up with a hard dripline around your structure that messes up the ground around it, all that water become useable, and eventually seeps back to the earth in a more gentle dispersed way.
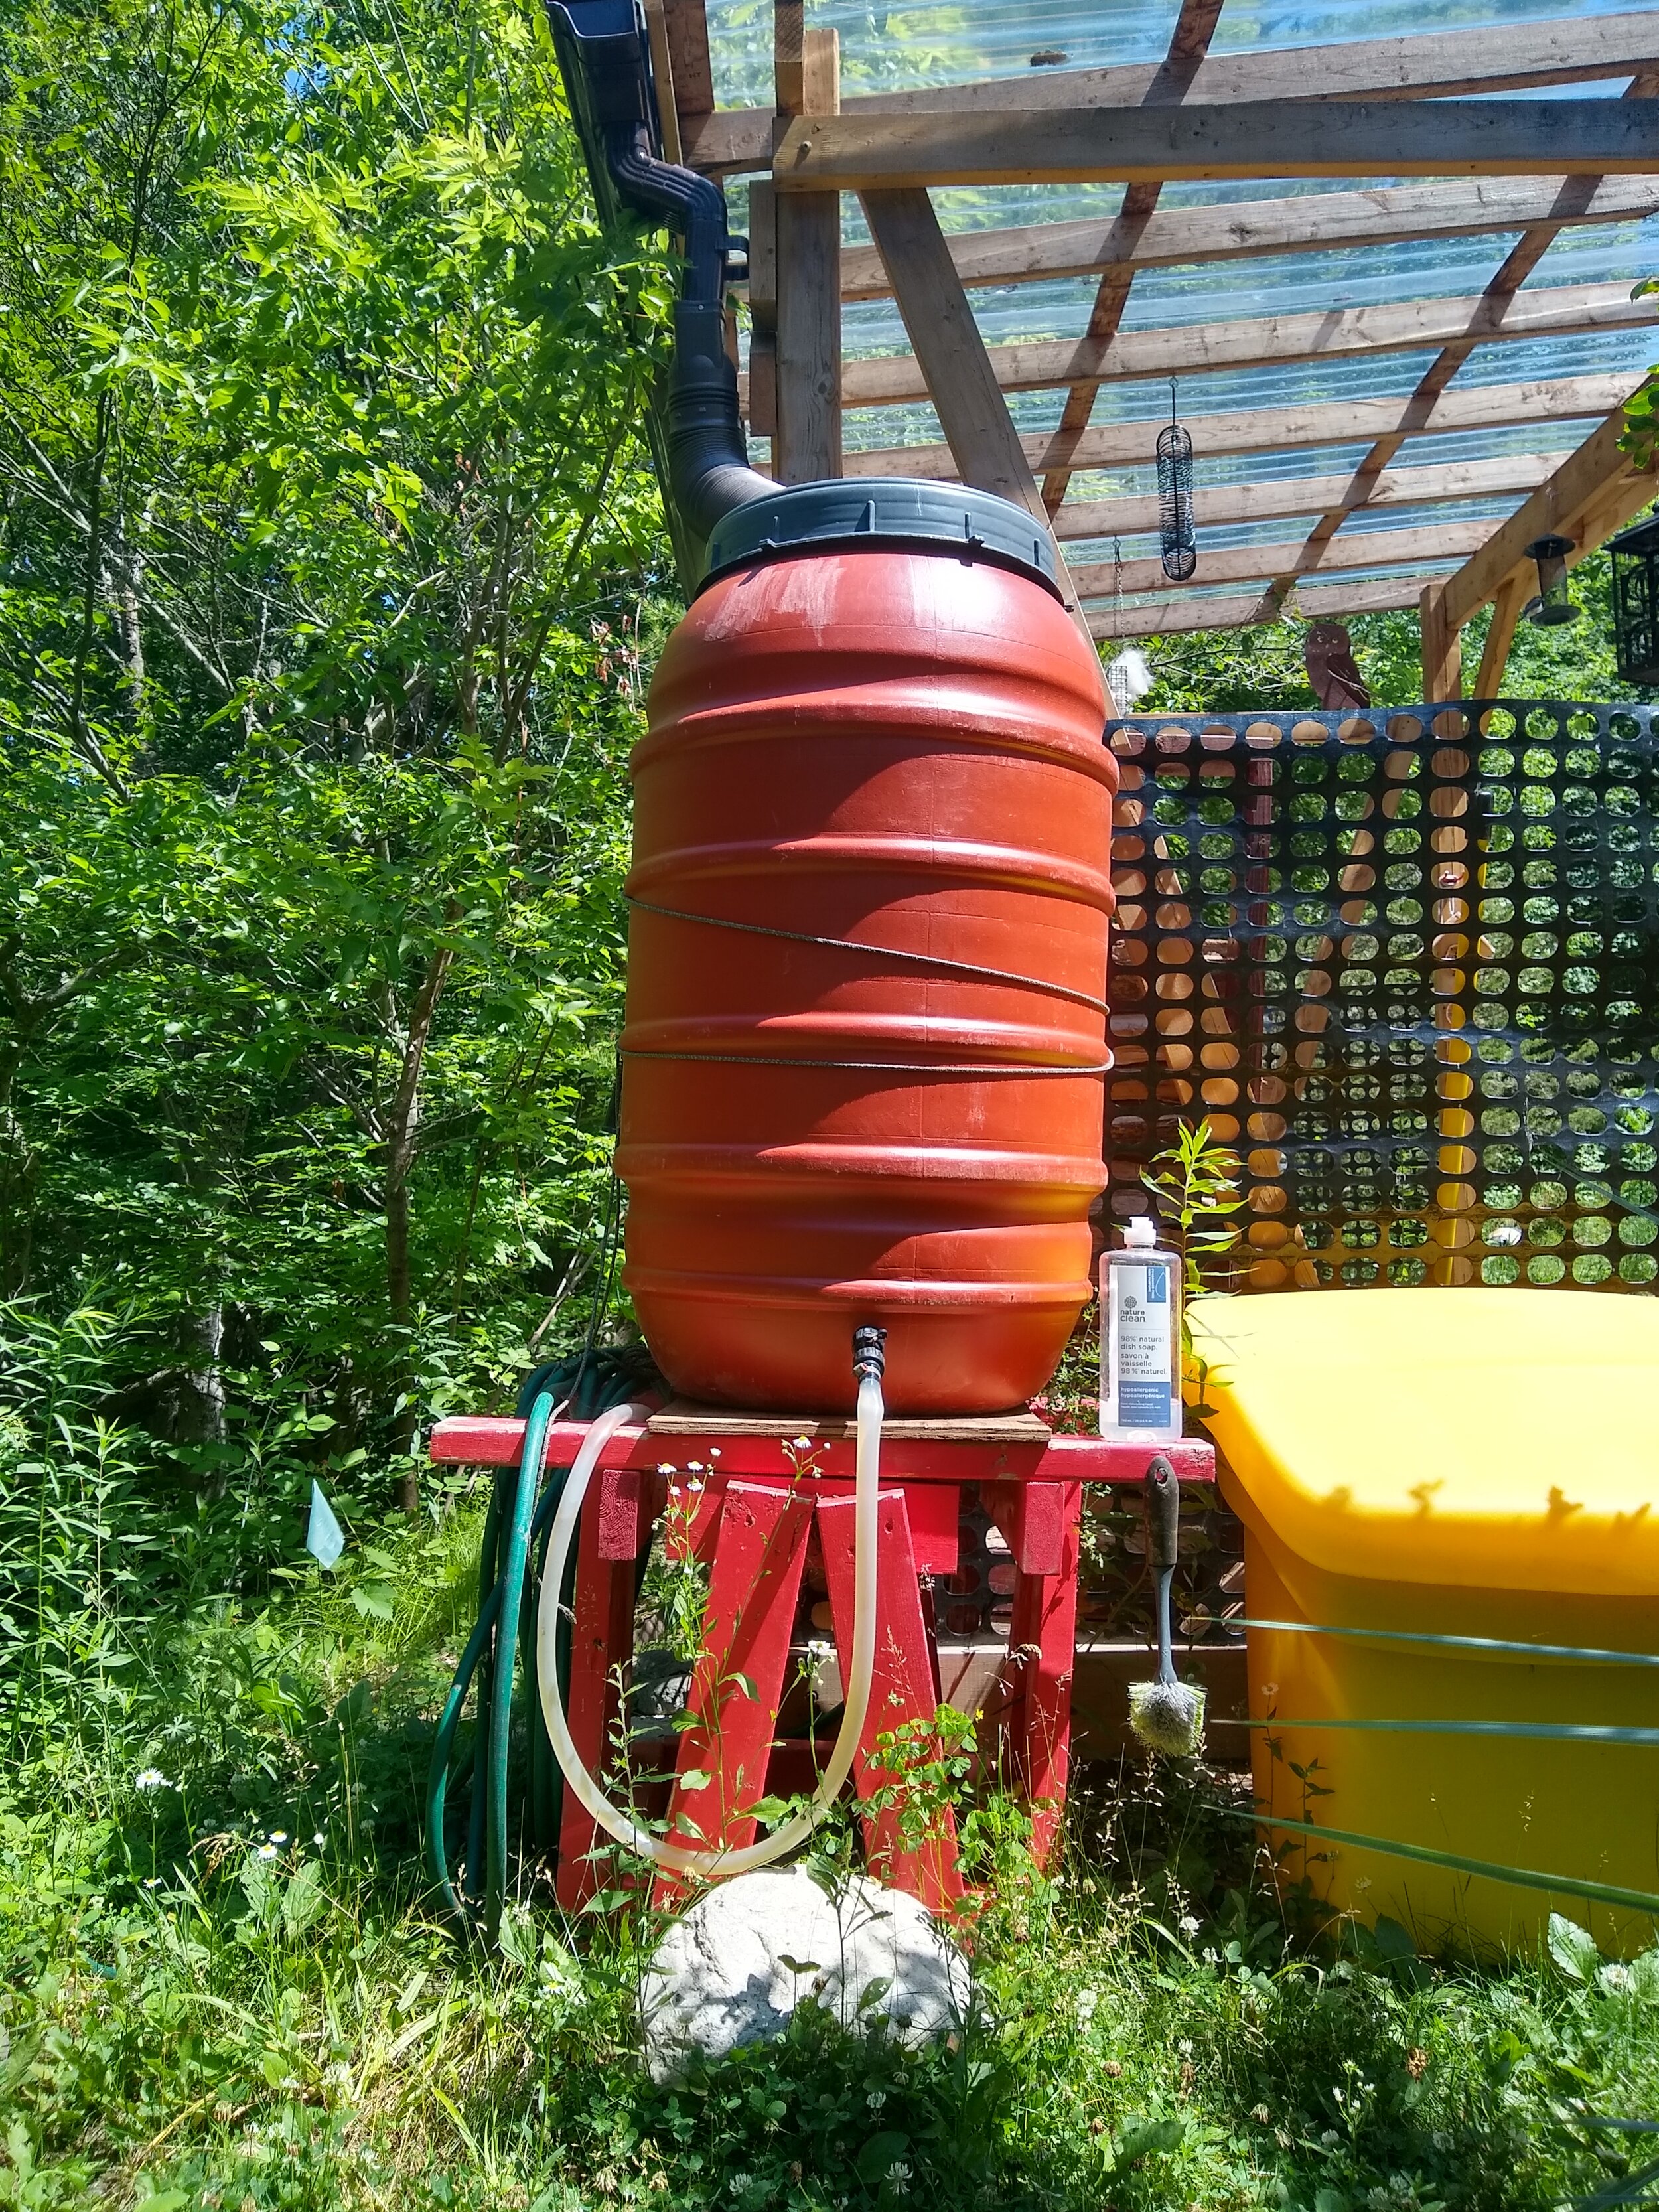
Just out of frame — the little dish we fill with rainwater on hot days for the birds, chipmunks and other woodland critters.
Instead of planting plants and then figuring out where their water will come from, “planting the rain” means to find the water first, and let the plant follow. If you have even the tiniest interest in rainwater, this video of Brad Lancaster in Tuscon, Arizona is a must watch.
Brad’s approach of “planting the rain” transformed the barren streetscape where he lives into a life-giving food-generating oasis, by rethinking what’s possible, and working with his neighbours. Read more and find resources at his website: Harvesting Rainwater.
““One of my primary mentors was an African water farmer, Mr Zephaniah Phiri Maseko. When I spent just one day with him, seeing how he converted a wasteland into an oasis just by planting the rain.
I said “Look, the water situation is so bad in my community I want to leave, where should I go?” And he slapped me on the shoulder and he said “You can’t go. If you run away from your problems, you’ll just plant problems everywhere you go.
You gotta go home, set your roots deeper than you ever thought possible and figure out solutions.” ”
Welcome back to the grey waters! More in our series of sharing what we do around here. The spirit of these is not “HERE IS WHAT TO DO DOUBLE-STAMPED IT”, but rather “Here’s what works for us — hope you find it helpful!” We’re an open-source homestead. 🙂 Try, learn, share, repeat.
Let’s get started. Here’s few of the no-tech grey water systems we’re currently using around here:

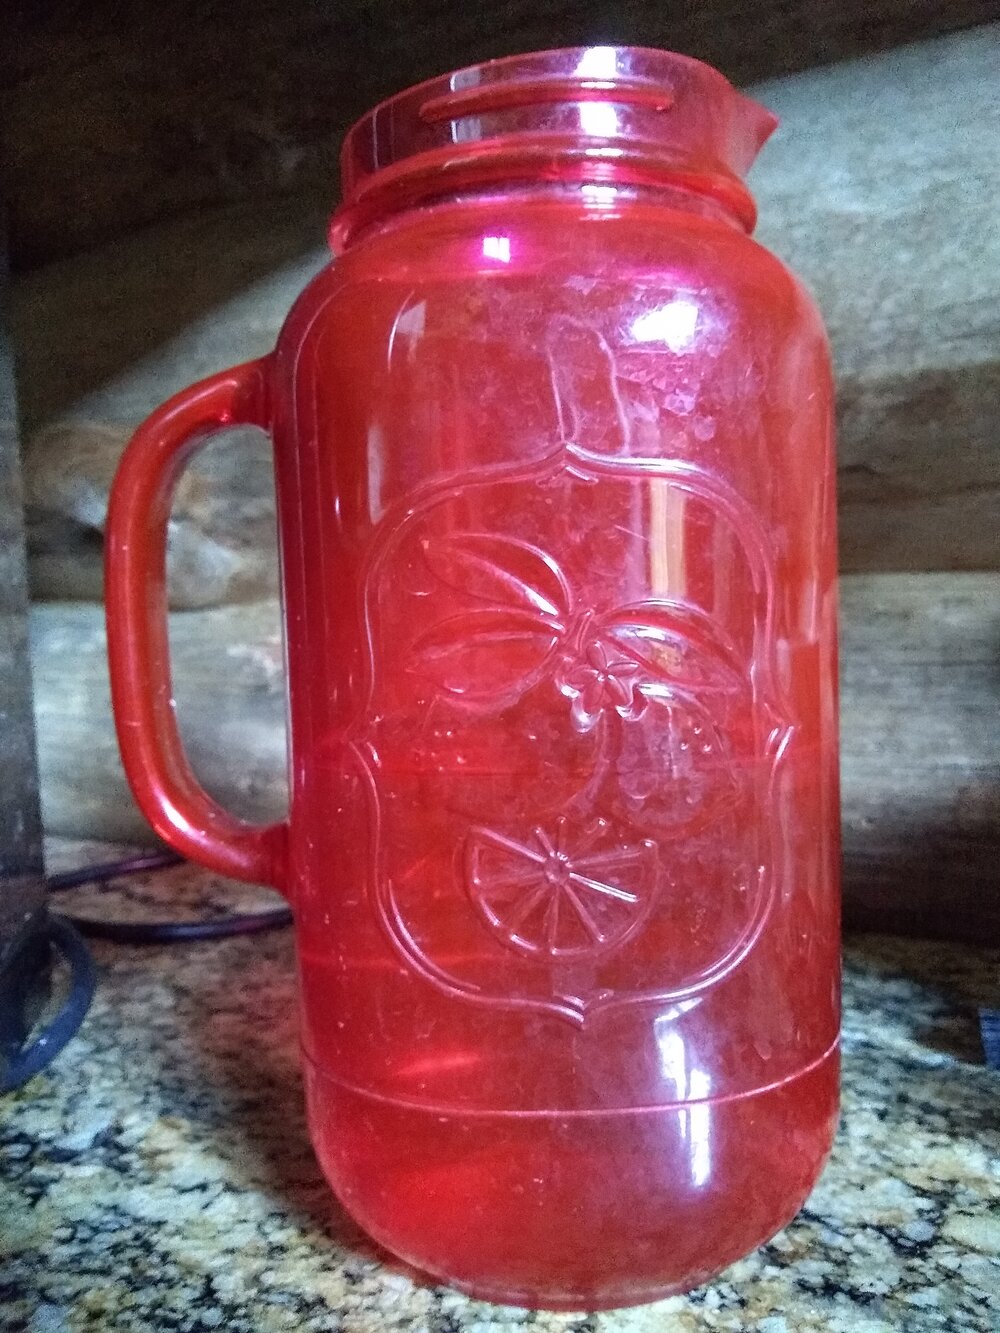
Behold its bespeckled majesty. The red jug keeps it real.
The Red Jug is a watersaving method we more-or-less drifted into. We have a nice glass carafe, but we got a big red plastic jug for when littles come to visit. It just took awhile for us to put it away again after one of those visits, and I popped it under the tap to catch the water while I was running it to get it hot.
The jug now lives full time on the counter beside the sink. Anytime we are running the tap for “a second” to get it hot or cold, the red jug is there to catch that water. It’s been a real eye-opener for just *how* much drinking water would run straight down the drain without it. Even when it’s just “a second”.
I drink a lot of tea, and that’s our primary use for the water in the red jug. We almost never fill the kettle from the tap now. The little bits and pieces of running the tap here and there keep the red jug pretty full, and it turns over pretty quickly. (I also enjoy sipping on a nice mug of boiled water, cuz I’m a weirdo.) We’ll also use the red jug water as boiling water for cooking — to boil pasta, potatoes, eggs. It’s super handy, a convenient vessel, and it feels great to know that fresh water is staying in use, rather than shooting down the drain.

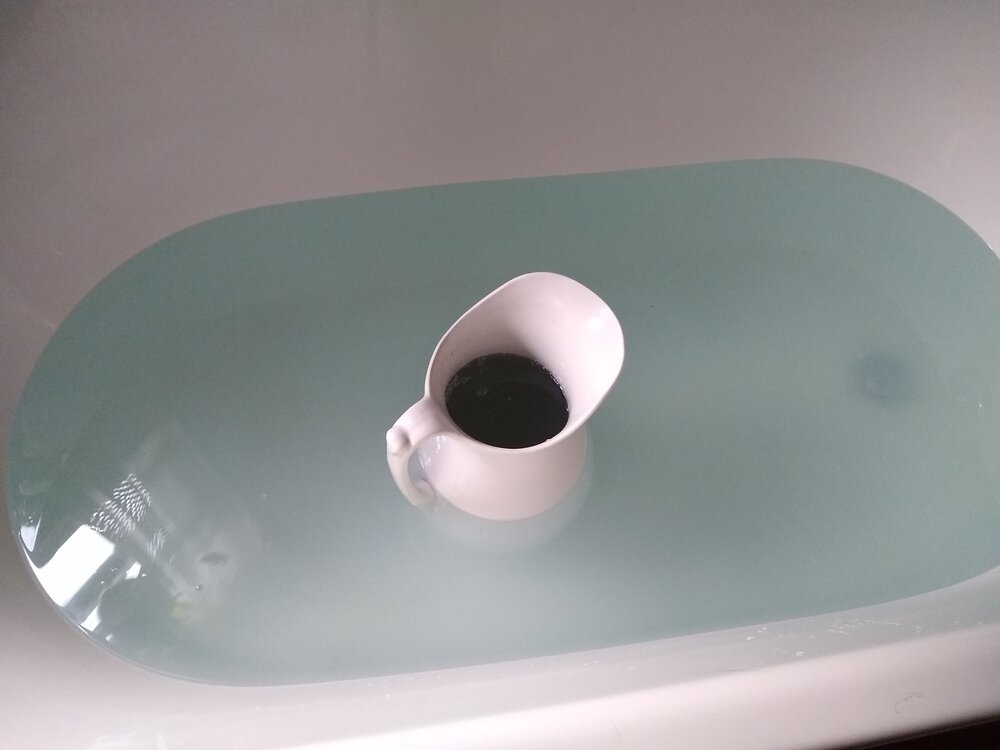
Rub-a-dub-dub-fill-the-tank-from-the-tub
We have a beautiful freestanding tub in a beautiful bathroom put together by the previous owners, who had great taste.
We also live on a well, and taking a bath uses a heck of a lot of water compared to a short shower. So baths are a special occasion, and sometimes seasonal if its an especially dry year.
But we also work hard, and the ol’ joints appreciate an occasional soaking.
The other thing that uses a heck of a lot of clean, drinkable water, is flushing a toilet. Even water-saving toilets like the ones we have use 4+ litres of drinking water every time you flush. It is madness that any house is designed for us to defecate in potable drinking water. Never mind that nearly all houses are designed that way. The water line that supplies the toilet tank is the same water line that supplies the drinking taps. Madness.
Many of our grey water hacks are attempts to work around this. The tank needs to be filled with water in order to flush, but that water could come from anywhere. So we keep a jug in the bathroom, and after one of us has had a bath, we won’t drain the tub, but instead use it like a little grey water lake. When it’s time to flush the toilet, we fill a jug with tub water. Then when we flush, we pour that water into the tank. If we wanted to be hardcore, we could shut off the water intake to the toilet tank and fill it all from the tub. But pouring in a jug still significantly affects how much water the toilet draws, and is the kind of simple patch that is easy to do.
It takes days before we’ve even really dented the water level in the tub, which really hits home just how much water is in that bathtub.
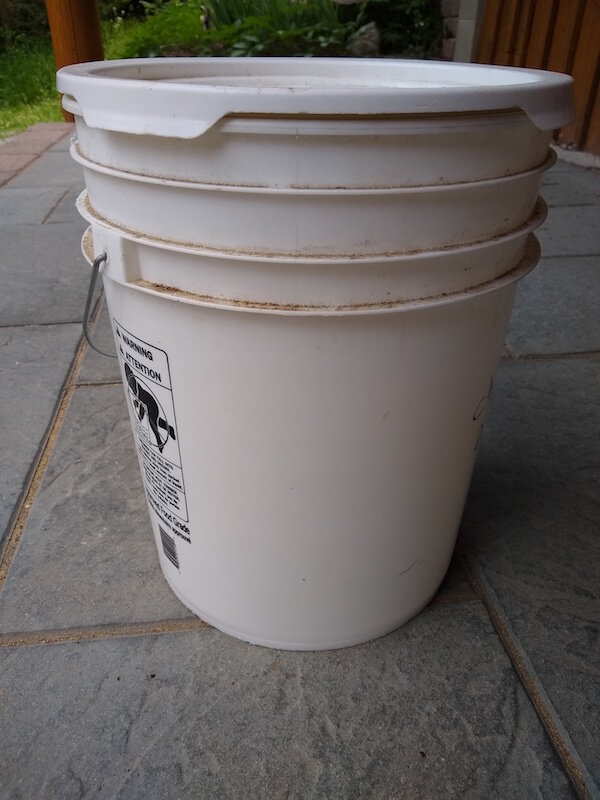
5 gallon buckets and blue tarps… now you’re homesteadin’!
The Big Ugly Flushing Buckets are just what they sound like — big 5 gallon white plastic buckets that sit in our bathroom. They function much the same as the bathtub reservoir — we pour jugs from them into the toilet tank as flushing water. You could definitely argue that these buckets make the place significantly less classy, but I’d counter that there’s not much that’s classy about pooping in drinking water.
We have a bunch of these buckets, and they get filled lots of different ways. One of the biggest is when we swap out our chicken waterers. We change the chicken’s water every day to keep it fresh, though the chickens don’t drink anywhere close to a full waterer. That means we have a reservoir of water that wasn’t touched by the chickens, but that has been sitting outside for a day. Instead of dumping it straight down the drain (and filling the septic tank), into the ugly flushing buckets it goes!
I have some plans for both elaborate (sensor-based) and simple (gravity-based) hacks to retrofit grey-water to our toilet tanks. And one day we may try out composting toilets. But “perfect” is the enemy of “done”. Every jug we pour into the toilet tank today is one jug more of drinking water not wasted.
“The earth, the air, the land, and the water are not an inheritance from our forefathers, but on loan from our children. So we have to handover to them at least as it was handed over to us.” – Mahatma Gandhi
Next time: More from our little Chicken Gardeners.

“The mind is like water. When it’s turbulent, it’s difficult to see. When it’s calm, everything becomes clear.” ~Prasad Mahes
“When you can’t have a shower, everything sucks, everyone is stupid, and nothing will get better ever.” ~Me
Our first year here there was a record-breaking drought in Ontario. So we found ourselves pretty immediately in the deep end of country life (but at least it was dry). Neither of us understood yet the practical realities of living on well-water. We knew nothing really about how wells worked, what a “trickle-tank” was, what were “good” and “bad” numbers on the pressure gauge, recovery time…
But you sure can learn fast as your hair gets greasy and your personal stink begins to build up.
There are only two of us here, plus animals, so our demands on the well are low. In that first year though, it was difficult to find a low that was low enough. In the end, our well performed pretty miraculously. It went dry one time, but rallied within the day. Though we didn’t actually know that at the time, because we didn’t know how to reset the pump after the emergency low-level shutoff kicked in. My poor brother and brother-in-law were visiting at the time, and I played good host by hand-pumping buckets of toilet flushing water from the rainwater tank outside. Our yelp reviews are flawless.
The well continued to empty but then slowly refill, keeping us in extremely carefully managed water while each of our neighbours’ wells went dry in turn, and they had to buy in tanks of water. We took our laundry to the laundromat in town, but otherwise army-shower and mellowyellowed — why, why must that term be so gross — our way through it.
It was a character-shaping and humbling experience, and kicked us into permanent water-wareness. The rainwater catchment system the house came with — a buried septic tank outside with a submersible pump, caching water from the roof — very quickly went from a nice-to-have to a thank-god-they-put-that-in.
Our house does not officially have a “proper” greywater system, but we have created at least a half dozen greywater mini-systems — each one a little bodge-job that saves a surprising amount of water. Together they’ve taught us that any home can have a greywater system. Invent your own! It doesn’t have to be fancyschmancy pants to make a real difference. If you have a bin in your sink to catch the water as you run the taps to get them hot, then you have a greywater system. If you turn off the tap when you’re brushing your teeth, then you are practicing water management. And that puts you solidly on Team Blue Gold, you water-saving warriors.
Here are a few of the things we do around here to stretch our water:
* The Red Jug
* Bathtub Reservoir Pond
* The Big Ugly Flushing Buckets
* Chicken Gardeners
* Roofs for Days
* Plant the Rain
Over the next few posts, we’ll share the details of these little hacks — what we do to save the rain and stretch the well. Best to share them, because the more ideas the better! Enough drops of water, and you’ll have an ocean.

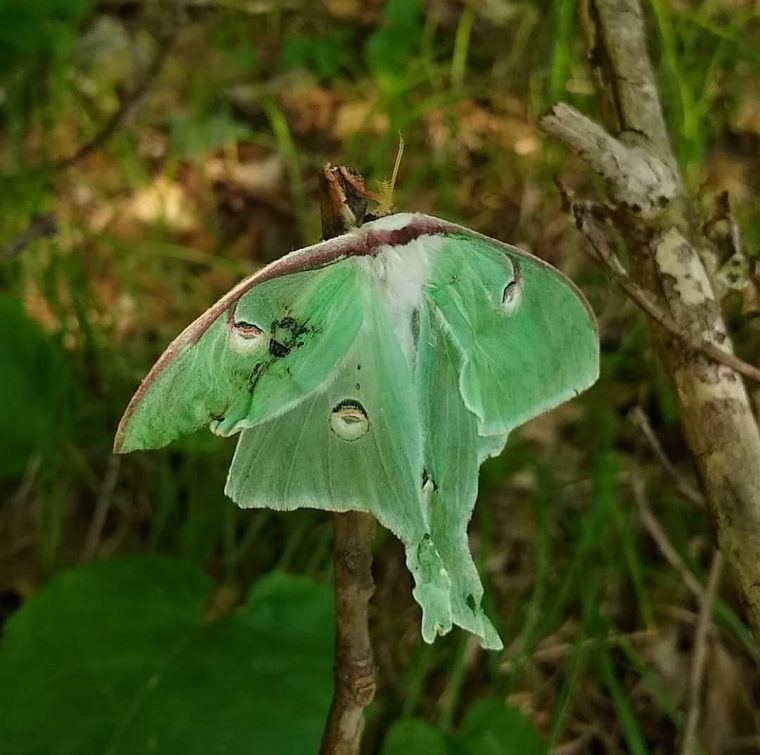
A luna moth was the first moth I encountered here that blew my moth mind right open.
I saw it across the woods. Like so many curiousities here, nothing bold, just slightly the “wrong” green.
And I always investigate “the wrong green”.
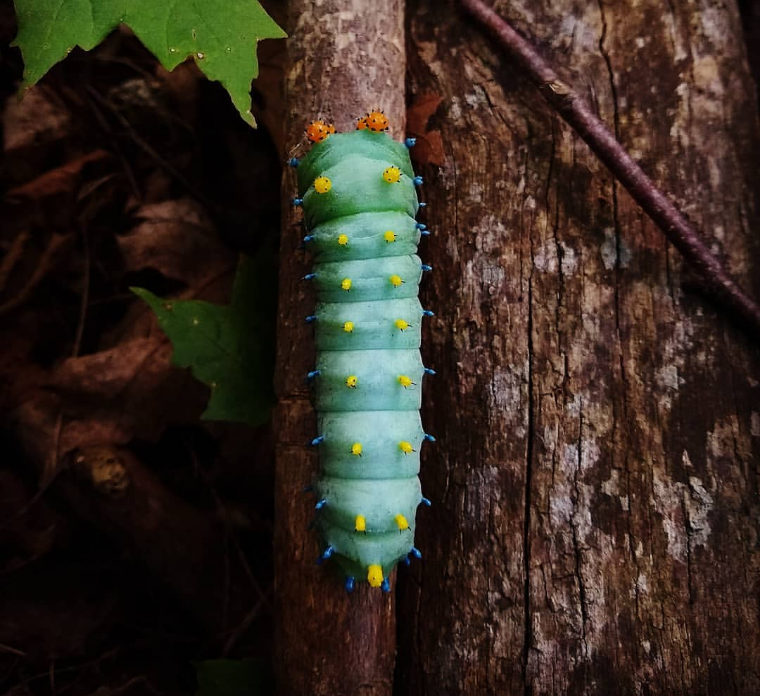
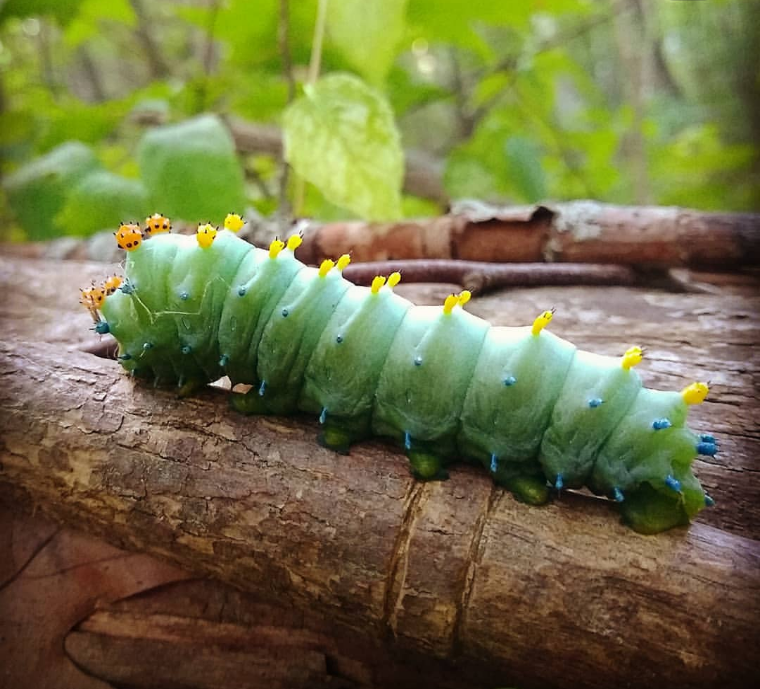
The next was another Saturniidae, this time in its caterpillar form. A cecropia. Nearly the width of my boot at the toes. A great fat colourful beast of a caterpillar. Mesmerizing in its magnificence.
Most recently, you guessed it, another other Saturniidae. This time an Io moth. Being decidedly not “solely nocturnal”, but flopping around on our deck. I didn’t think it looked injured, and it got happily still once it found its way into the shade of the barbecue. It is hidden under there now, I’m guessing waiting quietly for night to fall.
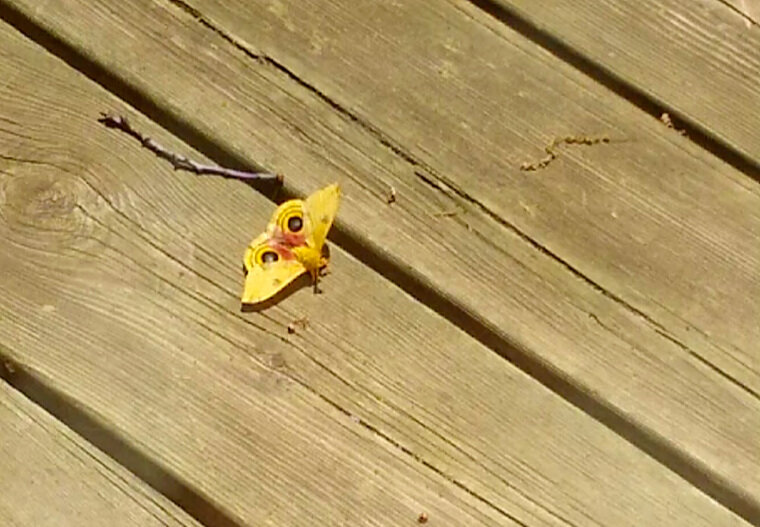
What most captured me about the Saturniidae was not the magnficence of their size and colour and shape. But that the first thing I learnt is that while they have mouthparts, they don’t use them. Adult saturniids do not eat. So in their adult winged form, they live only for a week or two — off the fats they stored as larvae. “Adult behaviour is devoted almost entirely to reproduction”.
It’s short, but what a life.
Hey mushroom fans! I have always had room for mushrooms in my heart — but the amount of space devoted to them has grown exponentially since moving to the woods. When I started seeing red-capped mushrooms popping up in the middle of the trail, or a glimpsed a flowery growth through the trees which hadn’t been there the day before, or when, be still my heart, I saw my first giant puffball, I realized I NEEDED TO LEARN WHAT THESE MAGICAL THINGS WERE.
I’m now an excellent reference book (“Mushrooms of Ontario and Eastern Canada” by George Barron), many dozen websites, some community lectures, a day-long workshop, a week-long workshop, and countless hours exploring the woods later. Which has taken me from completely ignorant to… solid beginner!
I knew nothing at all about mushrooms, so part of the joy in learning was learning how to look at them. Mushrooming tends to throw you in at the deep end, with mushroom folks going Full Nerd on you without a beginner’s introduction. And if you jump straight to the basidia of the hymenium of basidiomycota, then someone who just thought that purple mushroom looked neat might feel like this pool only has a deep end.
So I made this handy-dandy sheet to start people off in How To Look At Mushrooms. I love IDing — nature is stuffed with puzzles which are in turn stuffed with stories — but to ID anything you first learn how to look at it. What are the parts I’m looking at? What are the things I’m looking for?
This sheet starts with gilled mushrooms, though there are also boletes and brackets and slime moulds and sac fungi and … But in my experience, once someone gets hooked looking at gilled mushrooms they will find their own way back to the slimes. In mushrooming, all roads lead to everywhere. If mushrooms have one lesson for us, it’s that everything is connected. You just need to take your first step.
Enjoy!
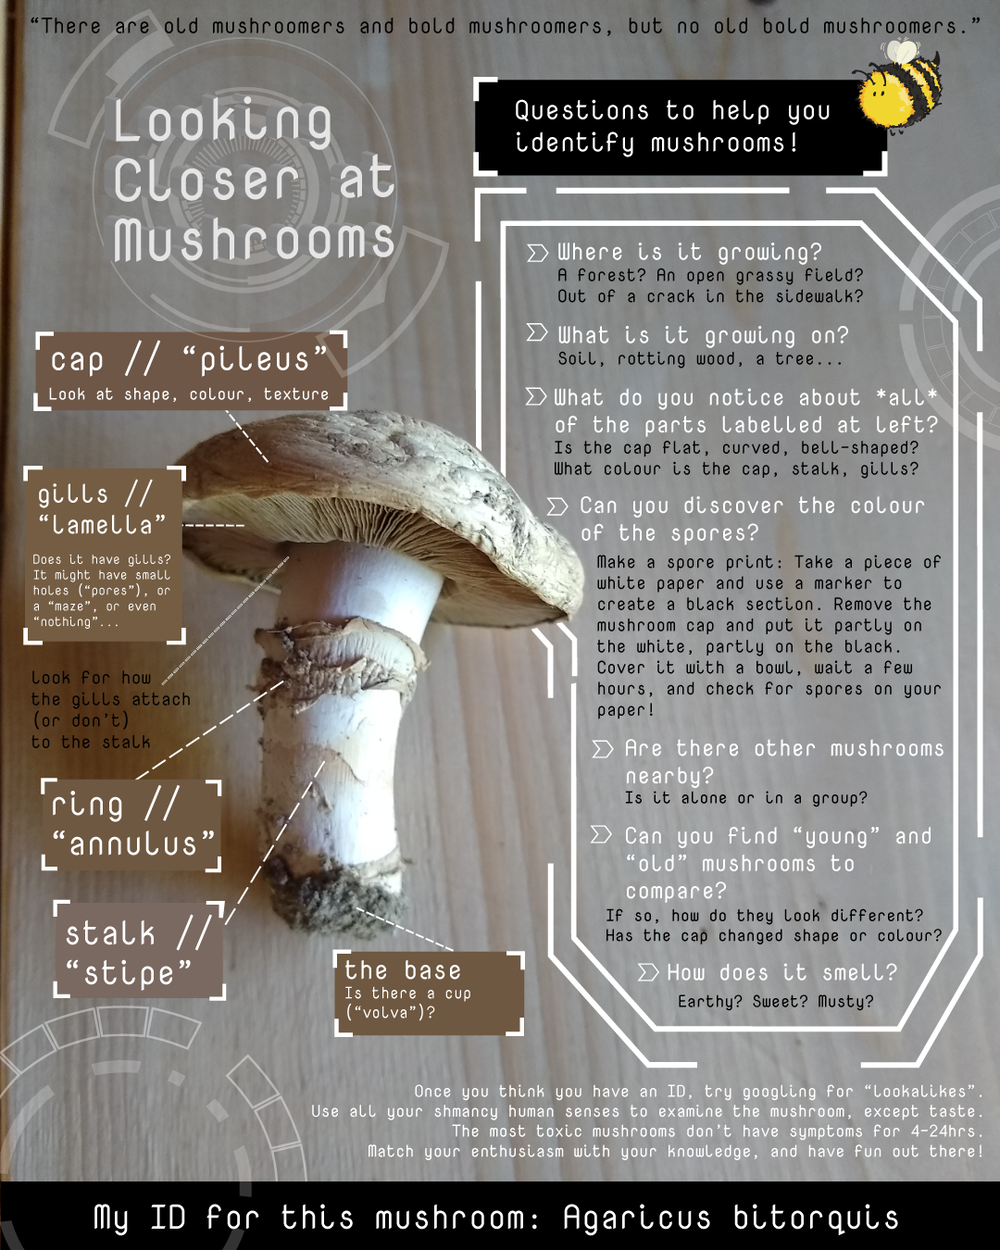
Fun fact: “bitorquis” means “two collars”, referring to the two rings on this mushroom’s stalk. Always dig into the scientific name — there is good stuff in there!
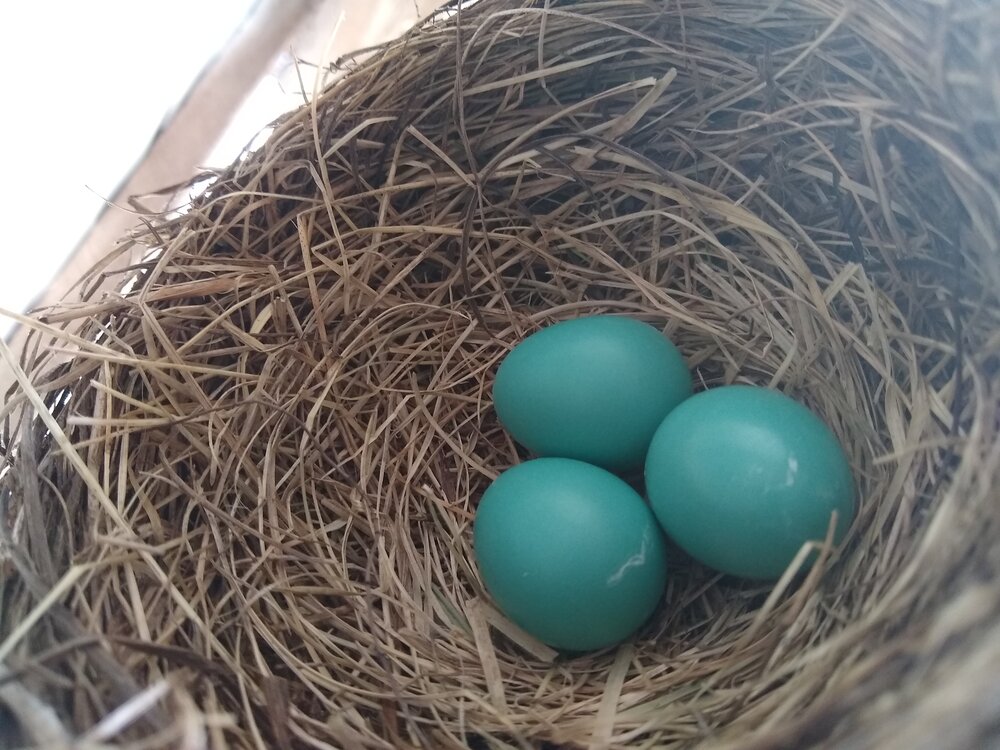
Each year our yard fills with robins, and each year, so far, at least one couple has chosen to nest on or beside our home. One year there was a robin — at least we think it was one robin — who made no fewer than 6 nests in different locations around our house and yard. There is a name for this phenomenon, though it escapes me at the moment. Essentially it’s a word for when a bird is spoiled for choice — when there are so many good spots to build that their instincts kick into overdrive and they just build and build and build. “This is a good spot! Oh no wait over here! Oh I didn’t know there was an option!” We’re in a log house, with overhangs and nooks and “branching” spots galore. Nest-building paradise.
This year, happily, is no different, with spring accompanied by a flurry of nest building. Yesterday I found this spring’s active nest — tucked up under the roof in the little lean-to space behind the house. Three beautiful eggs and watchful parents. Dad around and chirping every evening, both birds beautifully dedicated to the task at hand. Birds are marvelous parents. They share the load in many ways I didn’t understand — with many dad birds in many species taking turns sitting on the nest. In robins, the mum does the incubating, but dad is responsible for much of the baby-rearing once they’ve left the nest (“fledged”). He gets to work teaching the young ones how to robin, while mum gets started on the second set.

I’m not counting them before they hatch… let’s just call it “a few”.
There are more eggs nestled warmly under another mum here right now. We’ve been seeing how feasible it is to embrace “broodiness” as part of our chicken keeping here. To “go broody” is when a hen wants to incubate eggs — that is, sit on them until they hatch. In chicken-keeping, it’s generally seen as a nuisance. She wants to be a mum, you want her to keep laying eggs. Broody hens will stop laying for the duration of their broodiness, and most keepers prefer to buy in pre-sexed chicks (to ensure they’re all hens) or use an electric incubator to hatch eggs. There are many reasons for this way of doing things, and I see the value in some, though not all, of them. The bigger conversations around chicken breeds, what is sustainable, and what happens to the roosters, is a chat for another time.
Each year at least one of our hens has gone broody. And broodiness is notoriously “contagious”’; one year we had 3 of our hens go broody at once. Not a lot of omelettes that spring. That was before we were ready to try letting broodiness play out, so it wasn’t until last year (our 3rd spring) that we were ready to try hatching some babies.
Our beautiful mutt hen Margie, who passed away in February, was our springtime mum, hatching out 3 babies last year. Two roosters and a hen: Pip, Squeak, and Beak. Margie was a fabulous mum. She did all the right things and it was gorgeous to watch her at work. Letting your broody hen raise the babies has many benefits and one is that you don’t actually have to do much. So long as you are keeping all your chickens sheltered and fed, the mum chicken will look after the little chicks herself — keeping them warm and fed and teaching them How-to-Chicken.
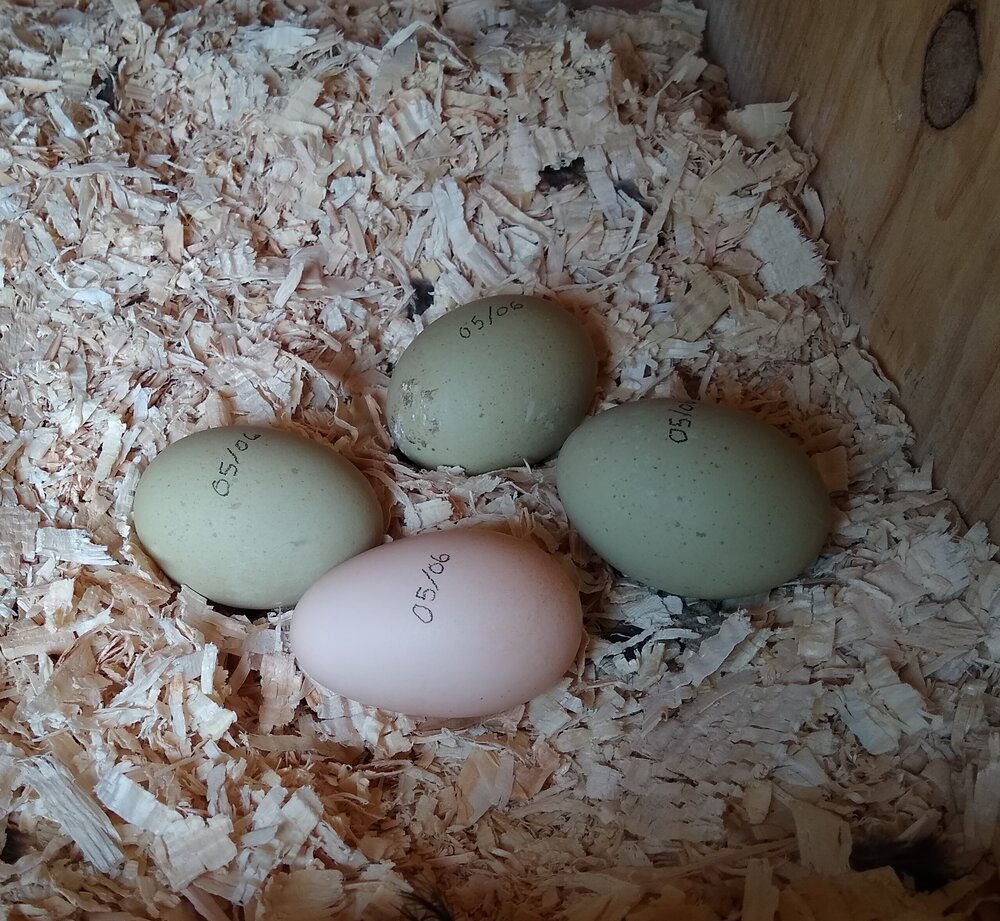
It seems Margie taught them well, because this year, totally surprising both Neil and I, little Beaky is the one to go broody! We’d been keeping an eye on SooZee, our silkie, who goes broody every year, and Haggis, our red sex-link, who’s been showing signs. But by late April, there was no denying that Beak was raring to go. We had put practice eggs (plastic easter eggs) in a nest box, to see if any of the chickens would sit on them. We’re looking to “staff up” our flock, so we were happy to encourage broodiness. Beak’s been on the plastic eggs consistently for nearly a week, with all the accompanying squawking at us when we disturbed her, so it was time to swap in the real deal.
Last night we tucked four eggs under Beak that we had set aside for hatching. All were laid within the past week, and kept carefully stored, so that we could put them under Beak all at once and they’d hatch on the same day. As we waited for confirmed broodiness, we’ve been cycling out the older eggs we’d set aside — they’re only viable stored for up to a week — and much to my delight, this timing means that we were able to pop a SooZee egg under her! If it hatches, it will be a silkie-easter egger cross. Chicken eggs are 21 days to hatch, so we’ve marked our calendars. Life is full of twists, turns, cul-de-sacs, and hard realities, and who knows if these eggs will come to hatch, and if they do, whether the chicks will be healthy and/or be able to join our flock. But there is always space for joy, all swirled in with the realities of life. So in you go little beauties — hope to meet you some day!